Global schemas: How-to
Let’s start with why you need to use Global Schemas to improve the efficiency and speed of tagging the pages on your website.
Certain content on your website will be consistent across all pages such as your address, your details as an organization, contacts on the header of your web page, as well as site navigation elements at the bottom of every page. This means that while tagging schema such repeatable content, you’ll have to add corresponding schema types across all URLs or web pages too. Here’s where you can use Global schemas to your advantage.
You can tag your repeatable content just once using the appropriate schema and then declare the schema as global to:
- either include across all pages of your website (also known as Global for all URLs)
- or reference it on specific pages as required (also known as Global for reference)
thus, reducing schema tagging time considerably
Let’s show you how to set global schemas across all URLs and to set them as a reference across URLs.
Set as Global for all URLs 
You can use this option when you wish to include a schema across all the URLs of your website automatically.
Step 1: On the Schema editor, click on the three dots against the schema which you wish to define as Global for all URLs. From the ensuing dropdown menu, select “Set as Global for All URLs”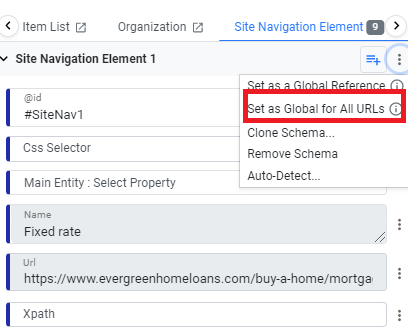
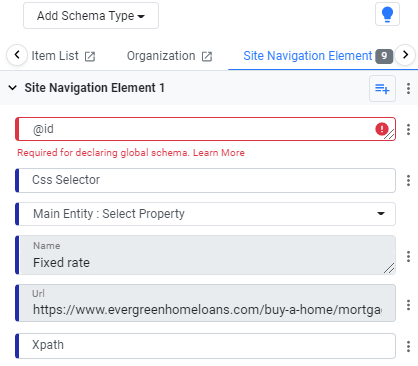
Note: Name and @id properties are mandatory for declaring a global schema. If not done, you will be prompted to do so when you try to declare a global schema.
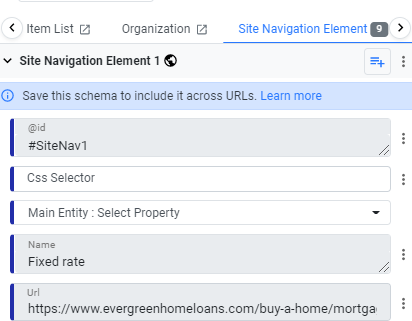
Step 2: After Clicking on the three dots on the right and selecting “Set as Global for All URLs”, you will see this message that you need to save the schema so that it can be included across all URLs.
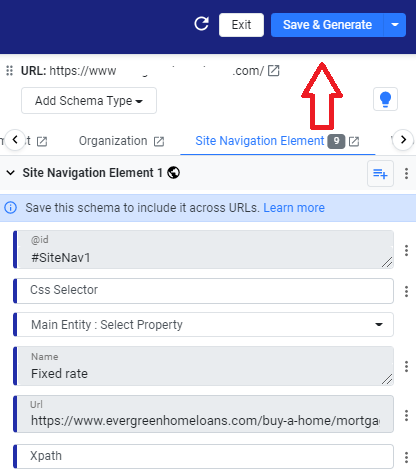
Step 3: Click on ‘Save and Generate’ to save it as a Global schema and publish it, if required.
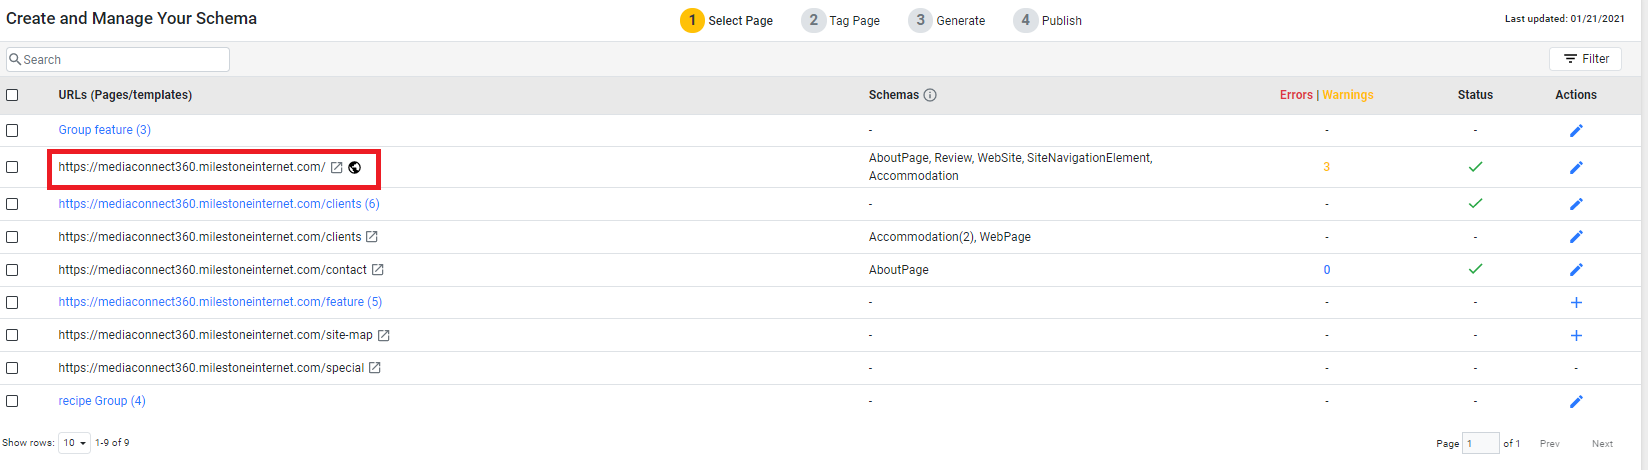
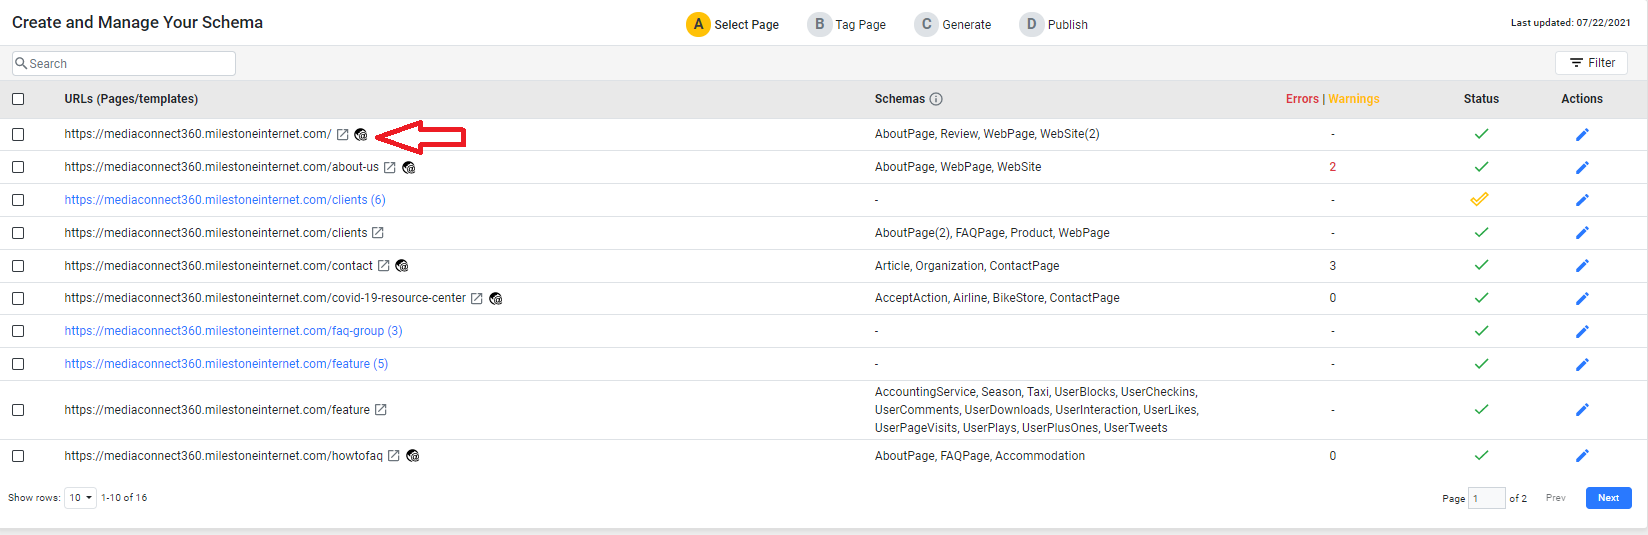
Back on the Tag Schema Page, you will now see the global Schema icon next to the URL for which you have declared global schema.
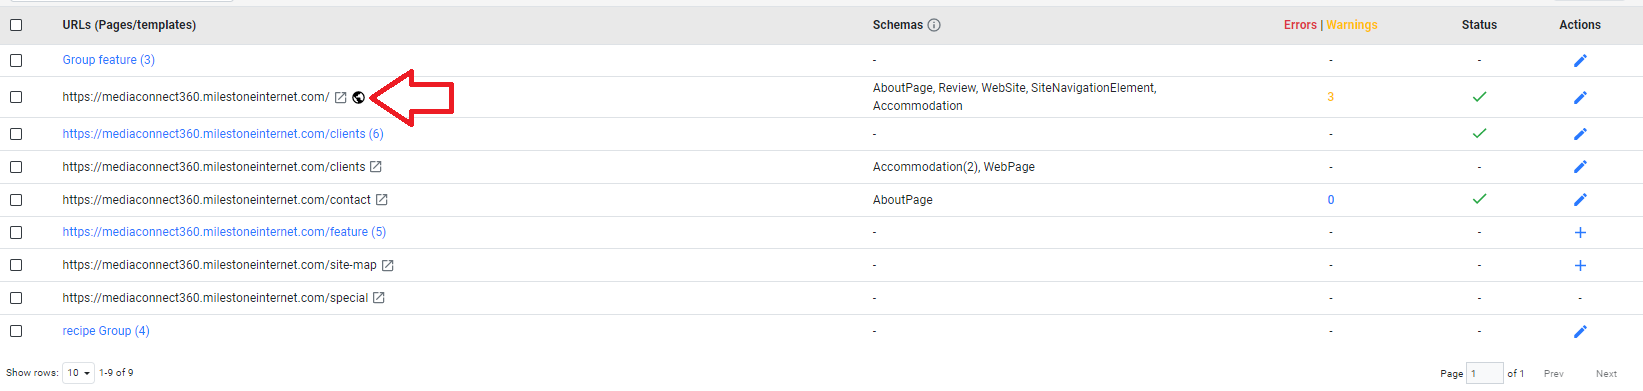
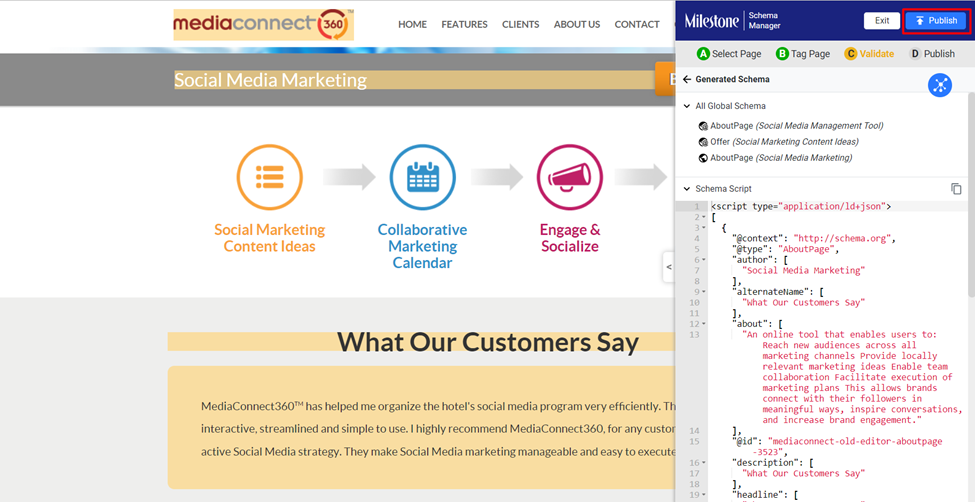
Once you have saved/published the Global Schema, you will be able to view it across all URLs as seen below on the schema generation view of another URL just before Publish.
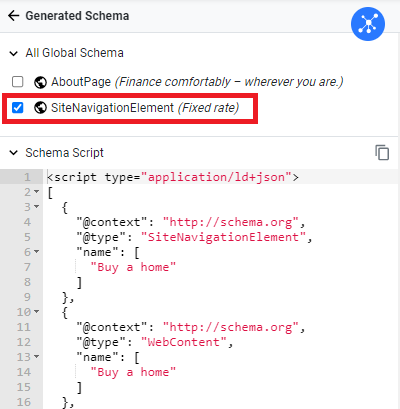
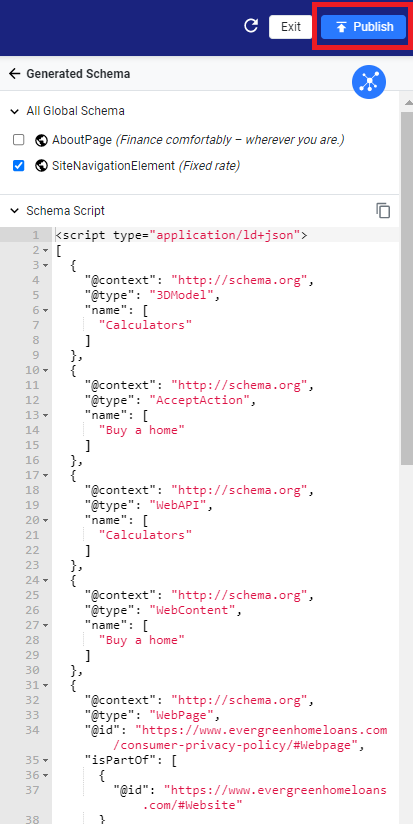
Note: You can choose to not include a Global schema for all URLs using the tickbox next to it at the time of publishing. For example, the 'AboutPage' schema above has been excluded.
Click on ‘Publish’ to include the Global Schema for that particular URL.
Note: After updating and saving/publishing a Global for all URLs schema, you need to re-publish all the URLs so that the updated version of the global schema also gets published for all URLs.
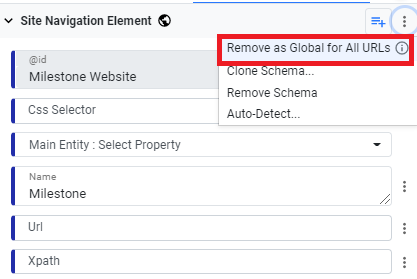
Remove as Global for all URLs
Step 1: To remove a schema as Global for all URLs, navigate to the page you included the schema on.
Step 2: On the schema editor, against the schema set as Global, click on the 3 dots on the top-right and click on ‘Remove as Global for all URLs’
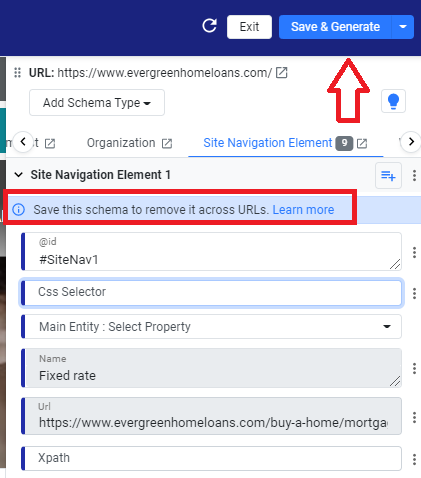
Step 3: You will see this message to save the schema to remove it across URLs. Click on ‘Save & Generate’ to remove it across all URLs.
Note: The existing functionality of Global schema is now renamed to Global reference. The icon of a schema declared for Global reference has been changed from to
to make it more relatable. The @ in the icon indicates that it is for reference only. The icon of the new functionality – Global for all URLs is a simple globe, indicating that the schema declared is available across all URLs.
Set as Global Reference
Instead of setting as Global across all URLs, you can choose to also set the schemas as Global Reference, which means that you can choose to refer this global schema within another schema on a URL on a need basis.
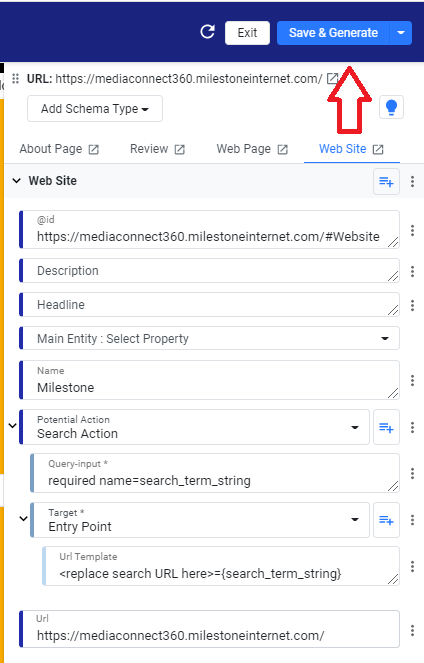
Step 1: On the Schema editor, select the desired schema, click on the 3 dots on the top-right of the editor, and click on ‘Set as Global Reference’
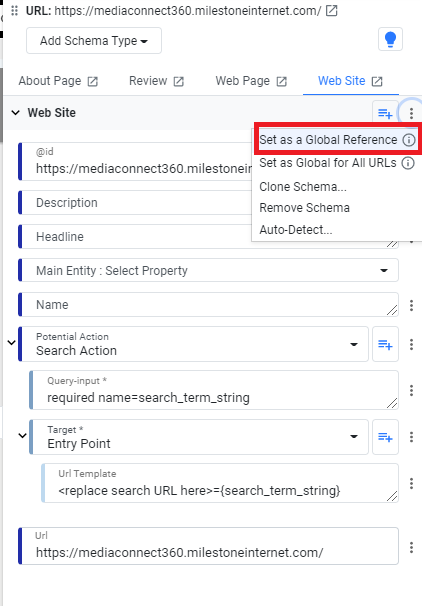
Note: Name and @id properties are mandatory for declaring a global schema. If not done, you will be prompted to do so when you try to declare a global schema.

Step 2: After Clicking on the three dots on the right and selecting “Set as a Global Reference” you will see a message that prompts you to save the schema to reference it across all URL. 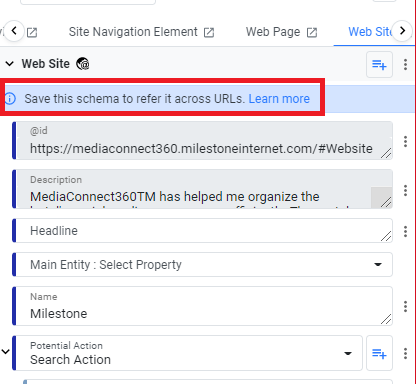
Step 3: Click on ‘Save and Generate’ to save it as a Global schema and publish if required.
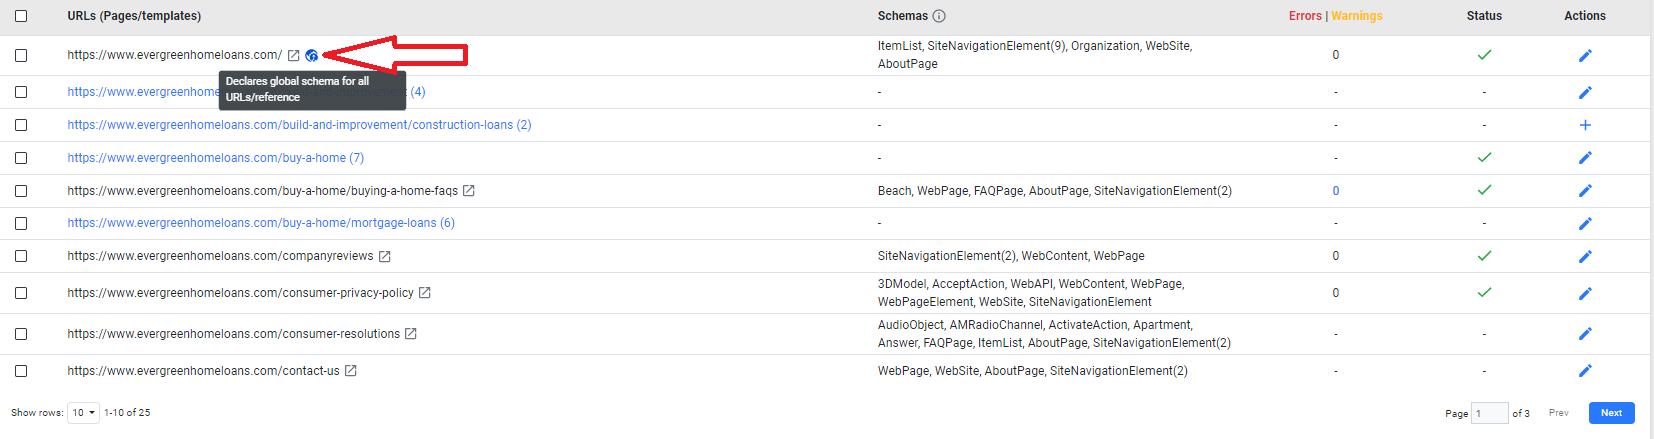
Back on the Tag Schema screen, you will see the Global reference icon against the URL that you've just saved the schema as Global Reference.
In addition, for URLs that have both, global schema across URLs as well as global reference, you will see this icon.
Referencing Global Schemas:
Now that you’ve set the schema as Global reference, let’s show you how you can reference it on other URLs.
Step 1: On the schema editor, all that you need to do to reference a Global Schema is to go the schema property which needs to refer to content which is represented via a global schema for reference.
i.e. A Web Page schema is a part of Web Site and needs to refer to Web Site schema declared globally for reference.
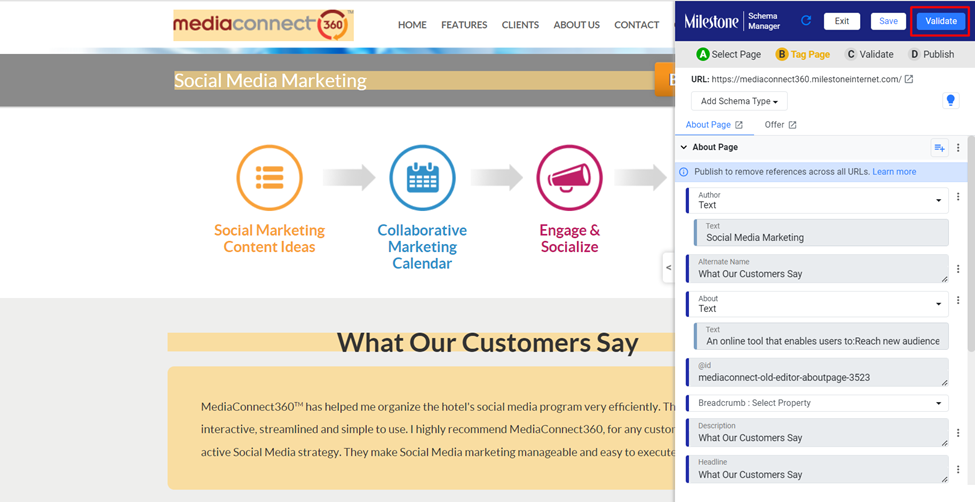
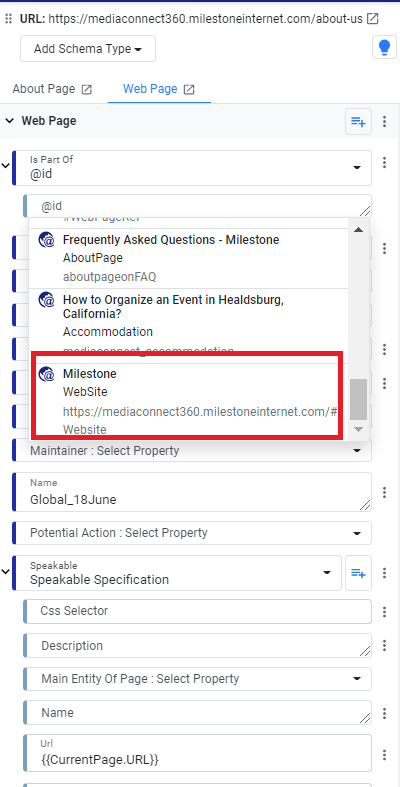 You will be able to view a Global Schema when referenced in a URL on the schema generation view just before Publish as seen below.
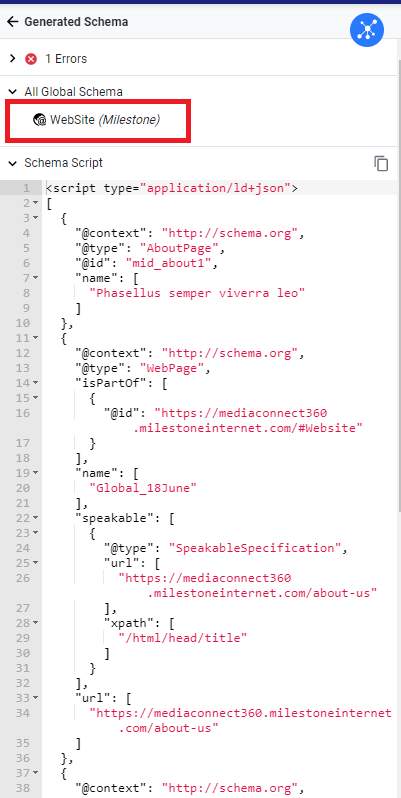
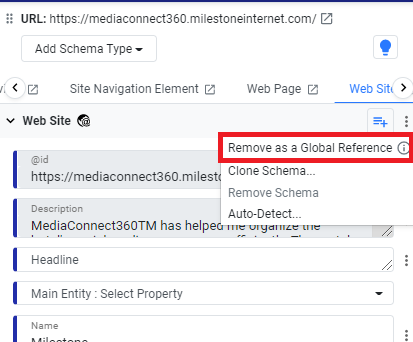
Remove as a Global Reference
Step 1: To remove a Global schema as a reference, choose the URL where you added the global schema as reference
Step 2: Against the schema you set as Global Reference, click on the 3 dots on the right and click on ‘Remove as a Global Reference’.
Note: If you have referenced a global schema in one or more URLs, you will need to remove those references before you can remove a schema as global. 
Clicking on ‘Show me the referencing URLs’ will take you the list of URLs referring to the schema that you want to remove in a separate tab
Once you have removed the reference schema from all other URLs, you can proceed to remove the Global Reference Schema.
Step 3: You will be prompted to save if you wish to remove the schema as a Global Reference. Click on ‘Save & Generate’ to do so. 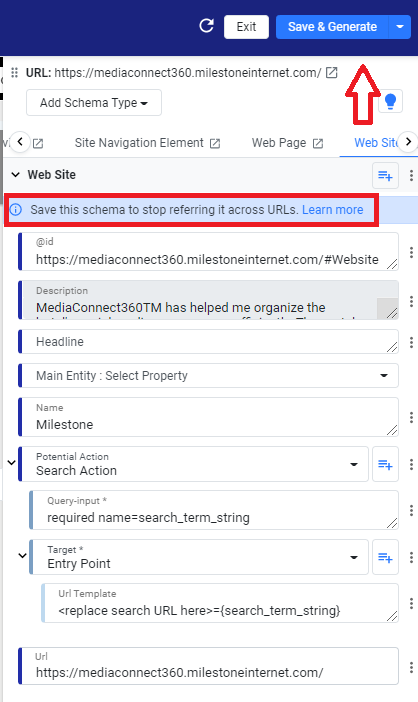
Note: After updating and saving/publishing a Global Reference schema, you need to re-publish all the URLs which referred to it so that the updated version of the global schema also gets published for all those URLs.
Why using @id and Name is essential when adding Global Schemas
You will want to uniquely identify the global schema that you create and that’s why @id and name are required. @id is a special identifier that ties to a schema to ensure it is uniquely identified by google when tying/linking entities on the Knowledge Graph as well as for the user to identify the schema set as global. The property ‘Name’ along with @id further helps in the identification of the set Global schema. For example, on a website, there are multiple organizations and the ‘Name’ property will further help call out this identification when using ‘Organization’ schema while @id could simply be #organization1, #organization2 etc.
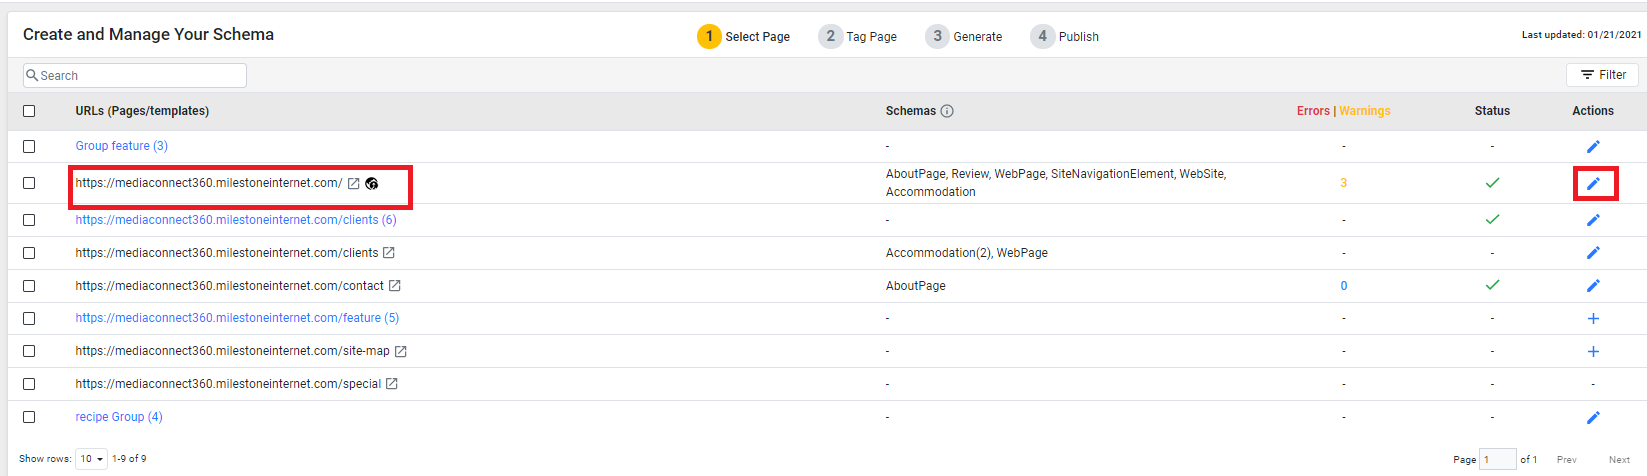
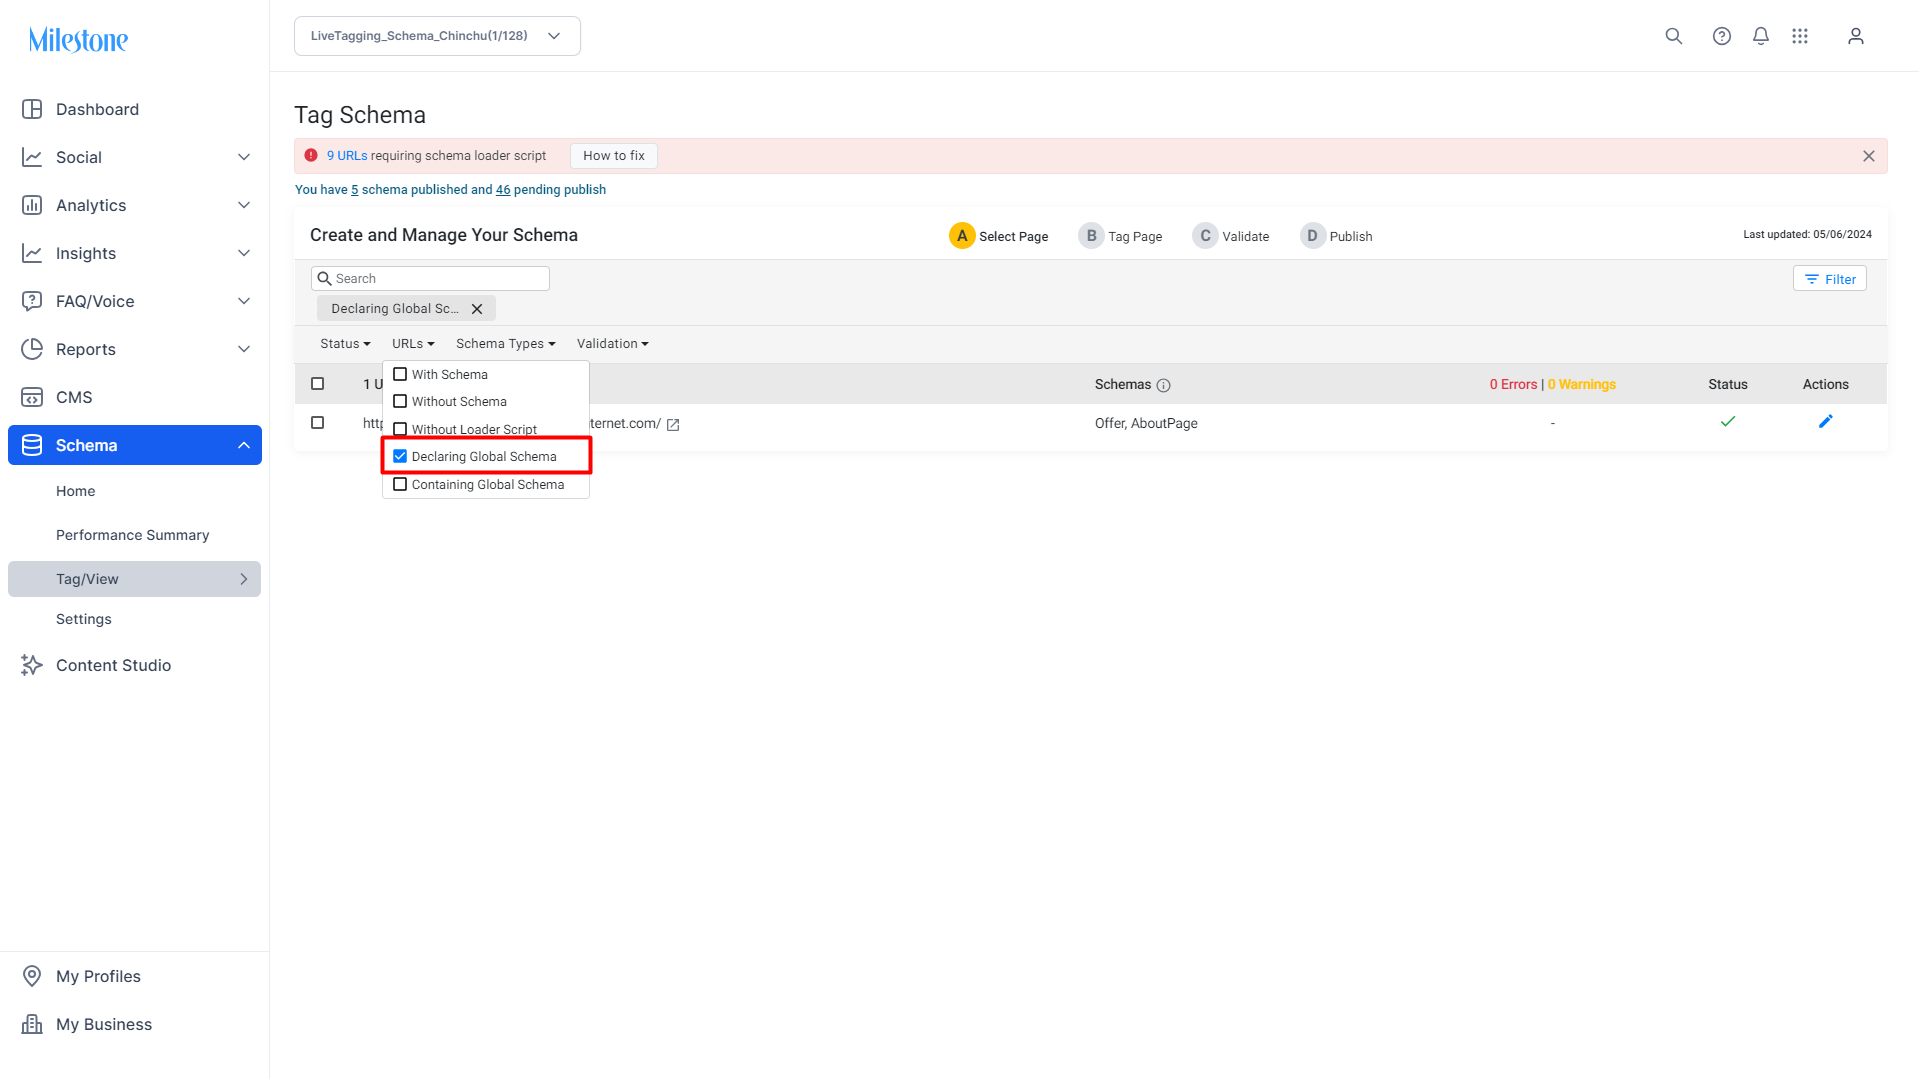
How to identify URLs that have declared one or more Global Schemas
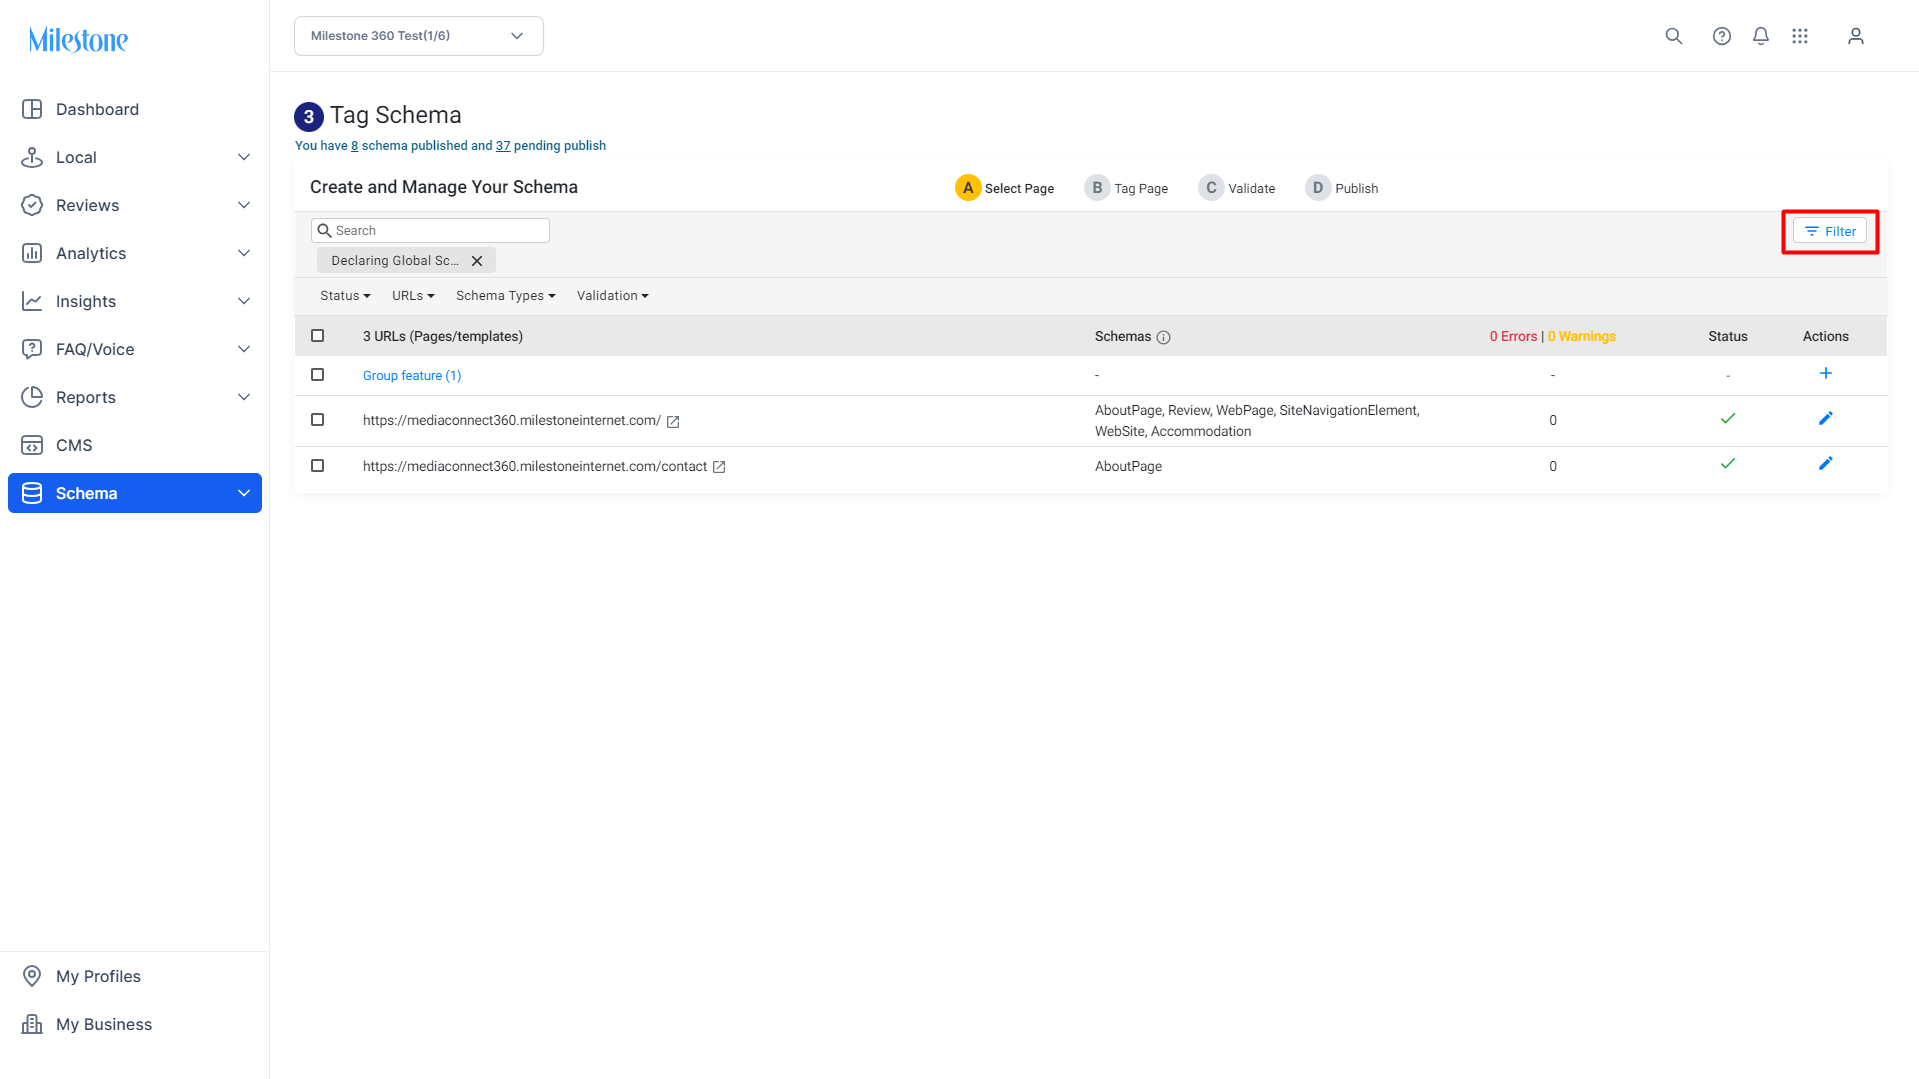
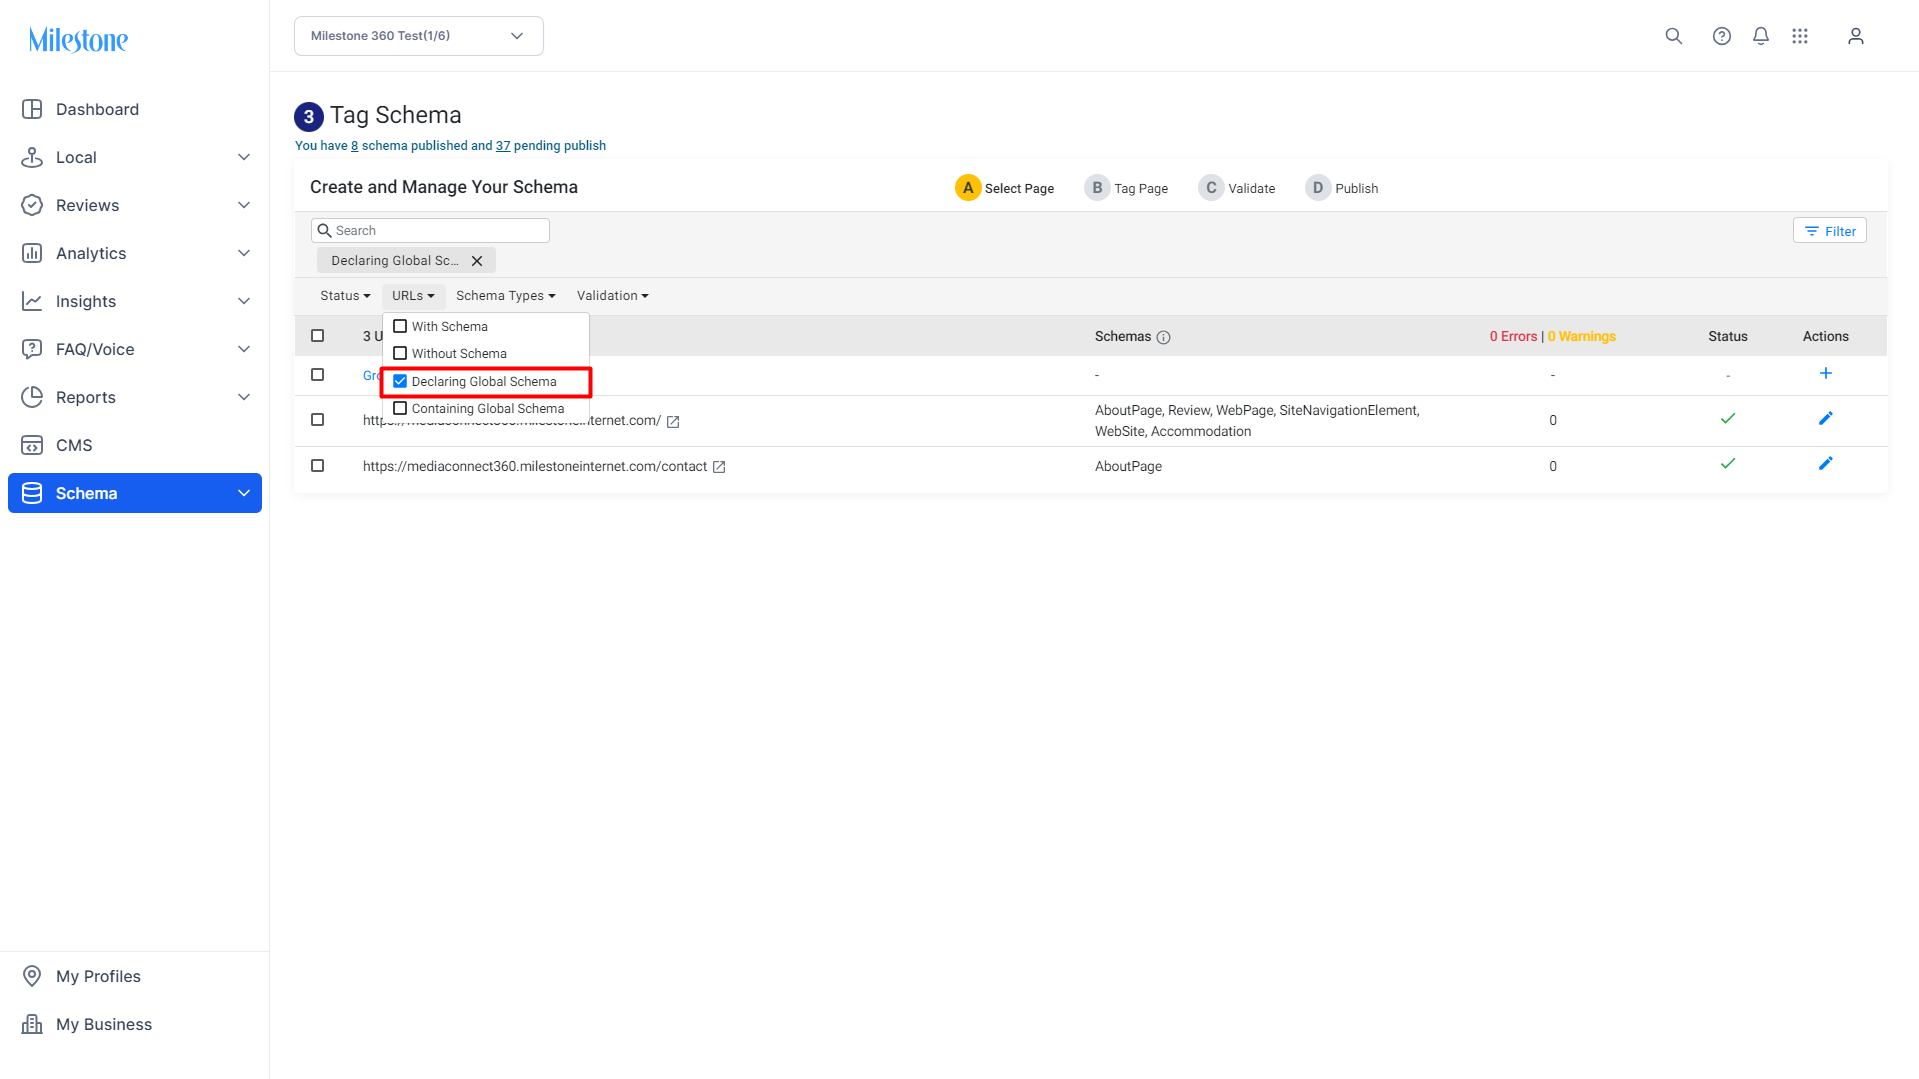
Once you have published global schemas, you can use the 'Filter option on the 'Tag Schema' page to filter pages that are 'Declaring Global Schema' and those that are 'Containing Global Schemas'. By choosing 'Declaring Global Schemas' you will view the URLs on which you have declared schemas as global, whereas choosing 'Containing Global Schemas' will display all the URLs to which you have referred or added the global schema.

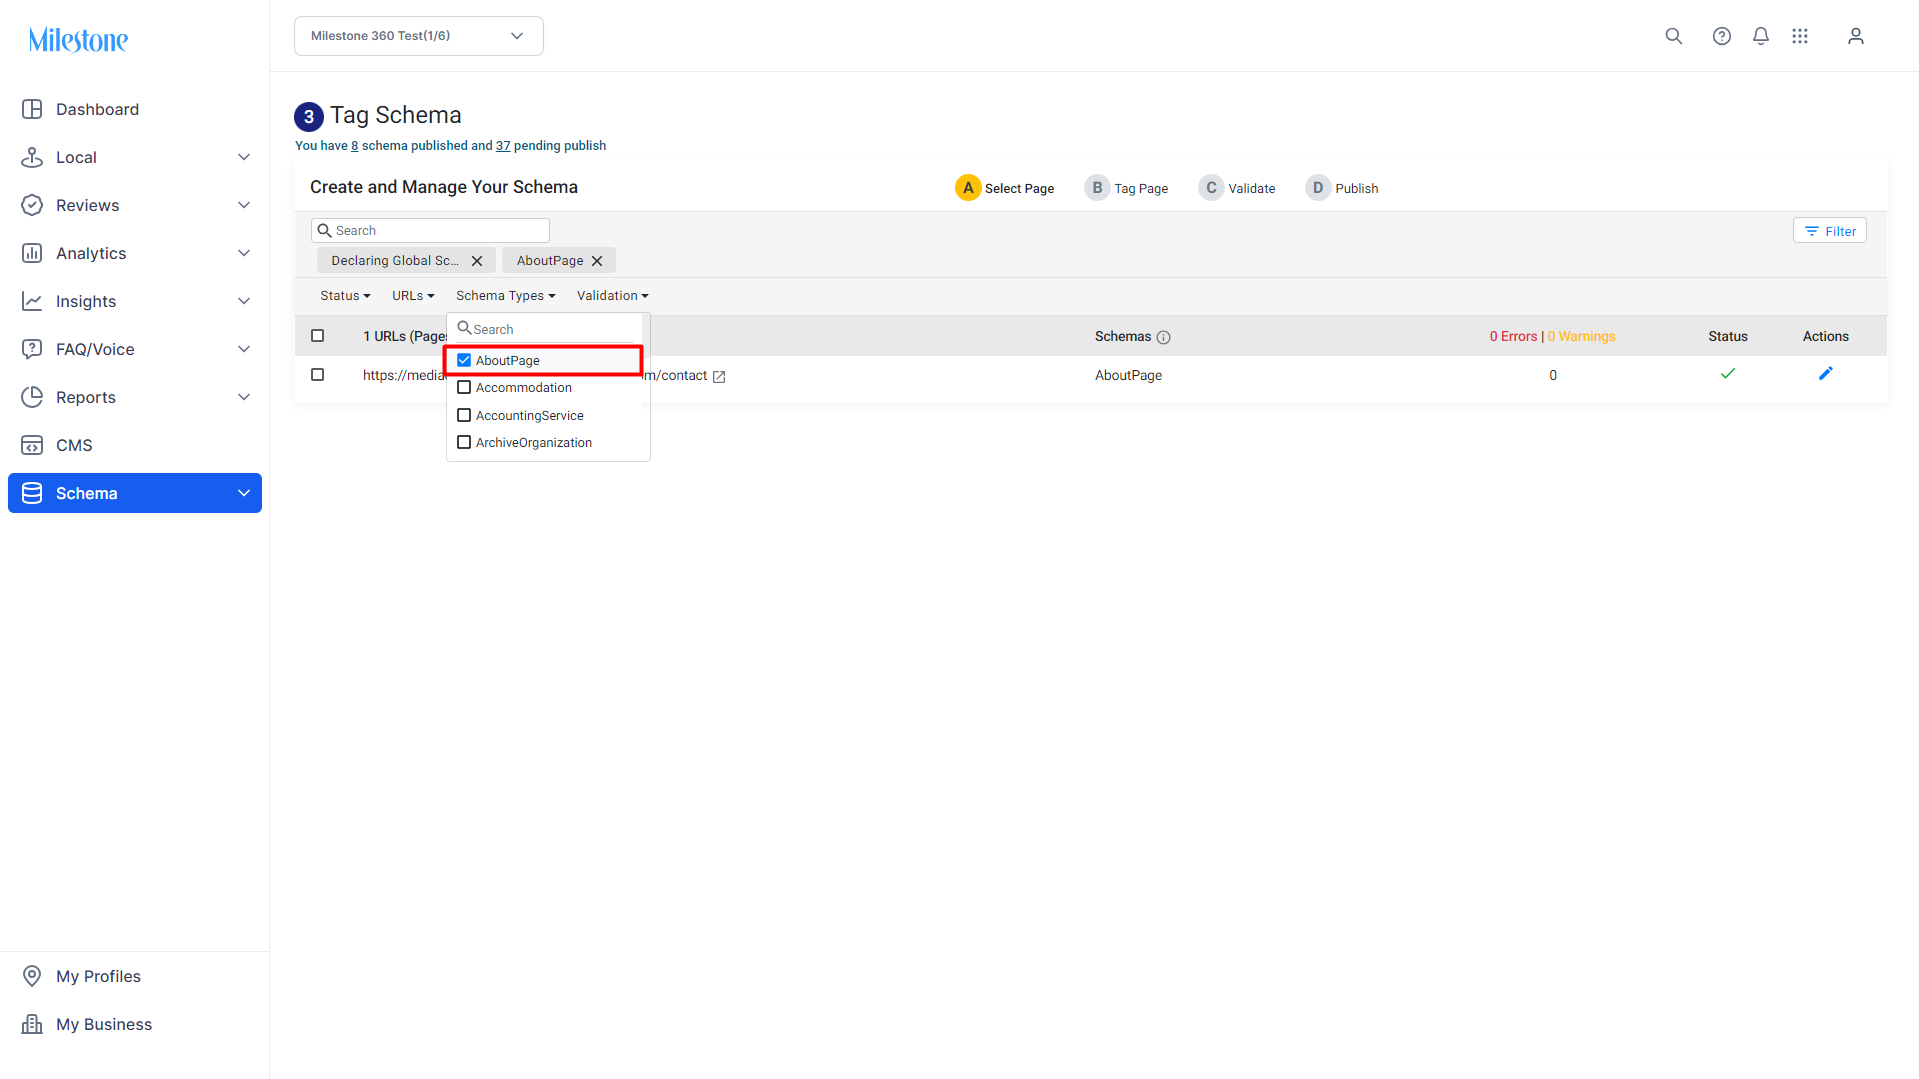
You can further narrow down your search and look for particular URLs using the 'Schema Types’ filter.

If you wish to look for URLs containing Global Schemas, click on ‘Containing Global Schemas’ from the URL filter.

This referred global schema also appears under schema column and is visible upon save/publish of the concerned URL. 
How to identify URLs that are referencing Global Schemas
URLs that are referencing Global Schemas can be found by filtering URLs that 'Contain Global Schema' in the 'Tag Schema' section. These URLs are not declaring Global Schemas but rather referring to Global Schemas declared in other URLs.
Step 1: Click on 'Filter' to the top right of the 'Select Page' section.
Step 2: Use the 'URLs' dropdown menu to select URLs 'Containing Global Schema'.
Step 3: Use the 'Schema Types' dropdown menu to select the Global Reference schema you wish to remove.
URLs that meet the filter selections will be displayed as seen below.
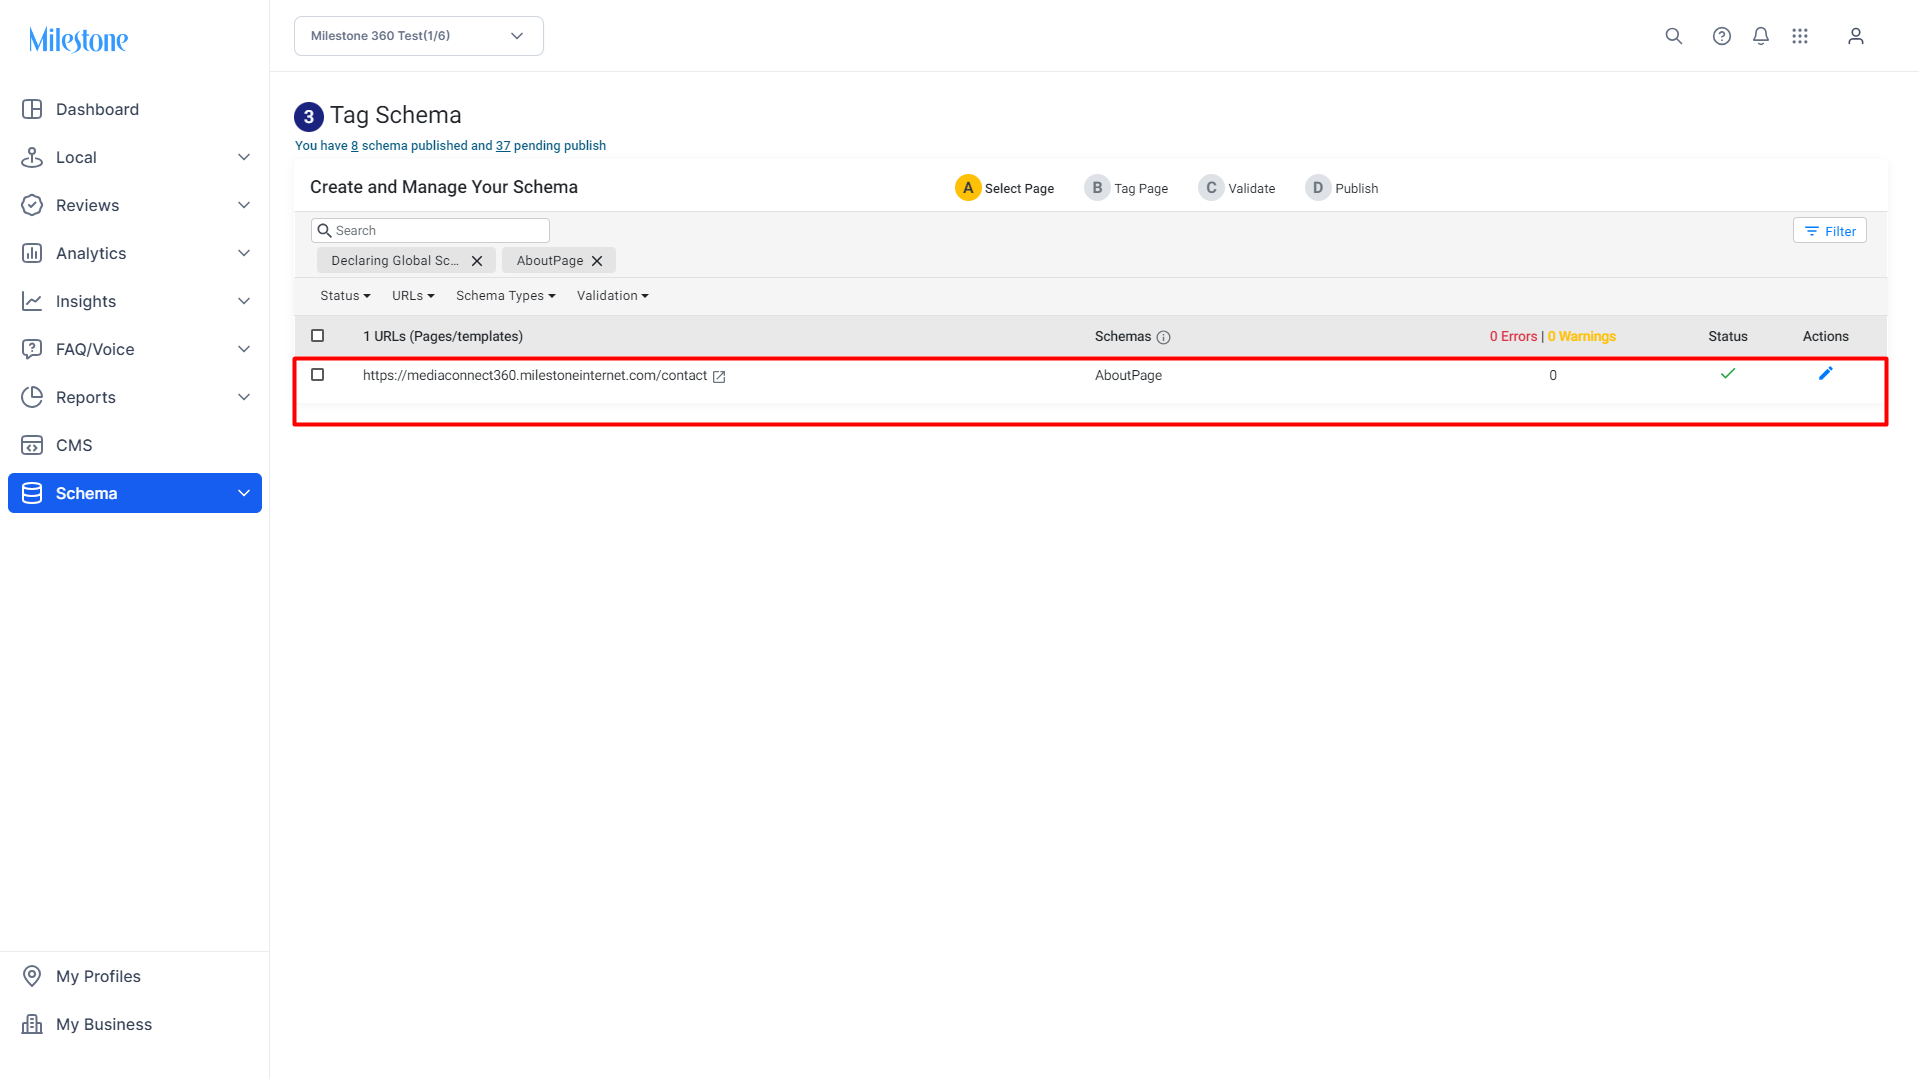
In this example, the 'AboutPage' schema is globally declared and is being referenced by these URLs.
Global Schema Maintenance and Auto-Update
Updating schema across multiple web pages is a time-consuming task, and redundant when it comes to schema that appears across web pages. Declaring global schema applies schema across all referencing or associated webpages for webpage elements that remain consistent across your website. For example, website navigation elements remain consistent across your website, and you can use a single web page to declare schema for website navigation elements across all the web pages of a website. But if there is a change to these website navigation elements it can be time-consuming and redundant to individually update the schema for each webpage.
Milestone Schema Manager lets you update globally declared schemas across all the referencing web pages in one go. This drastically reduces schema deployment and maintenance times, ensuring your schema is always up to date with your website content.
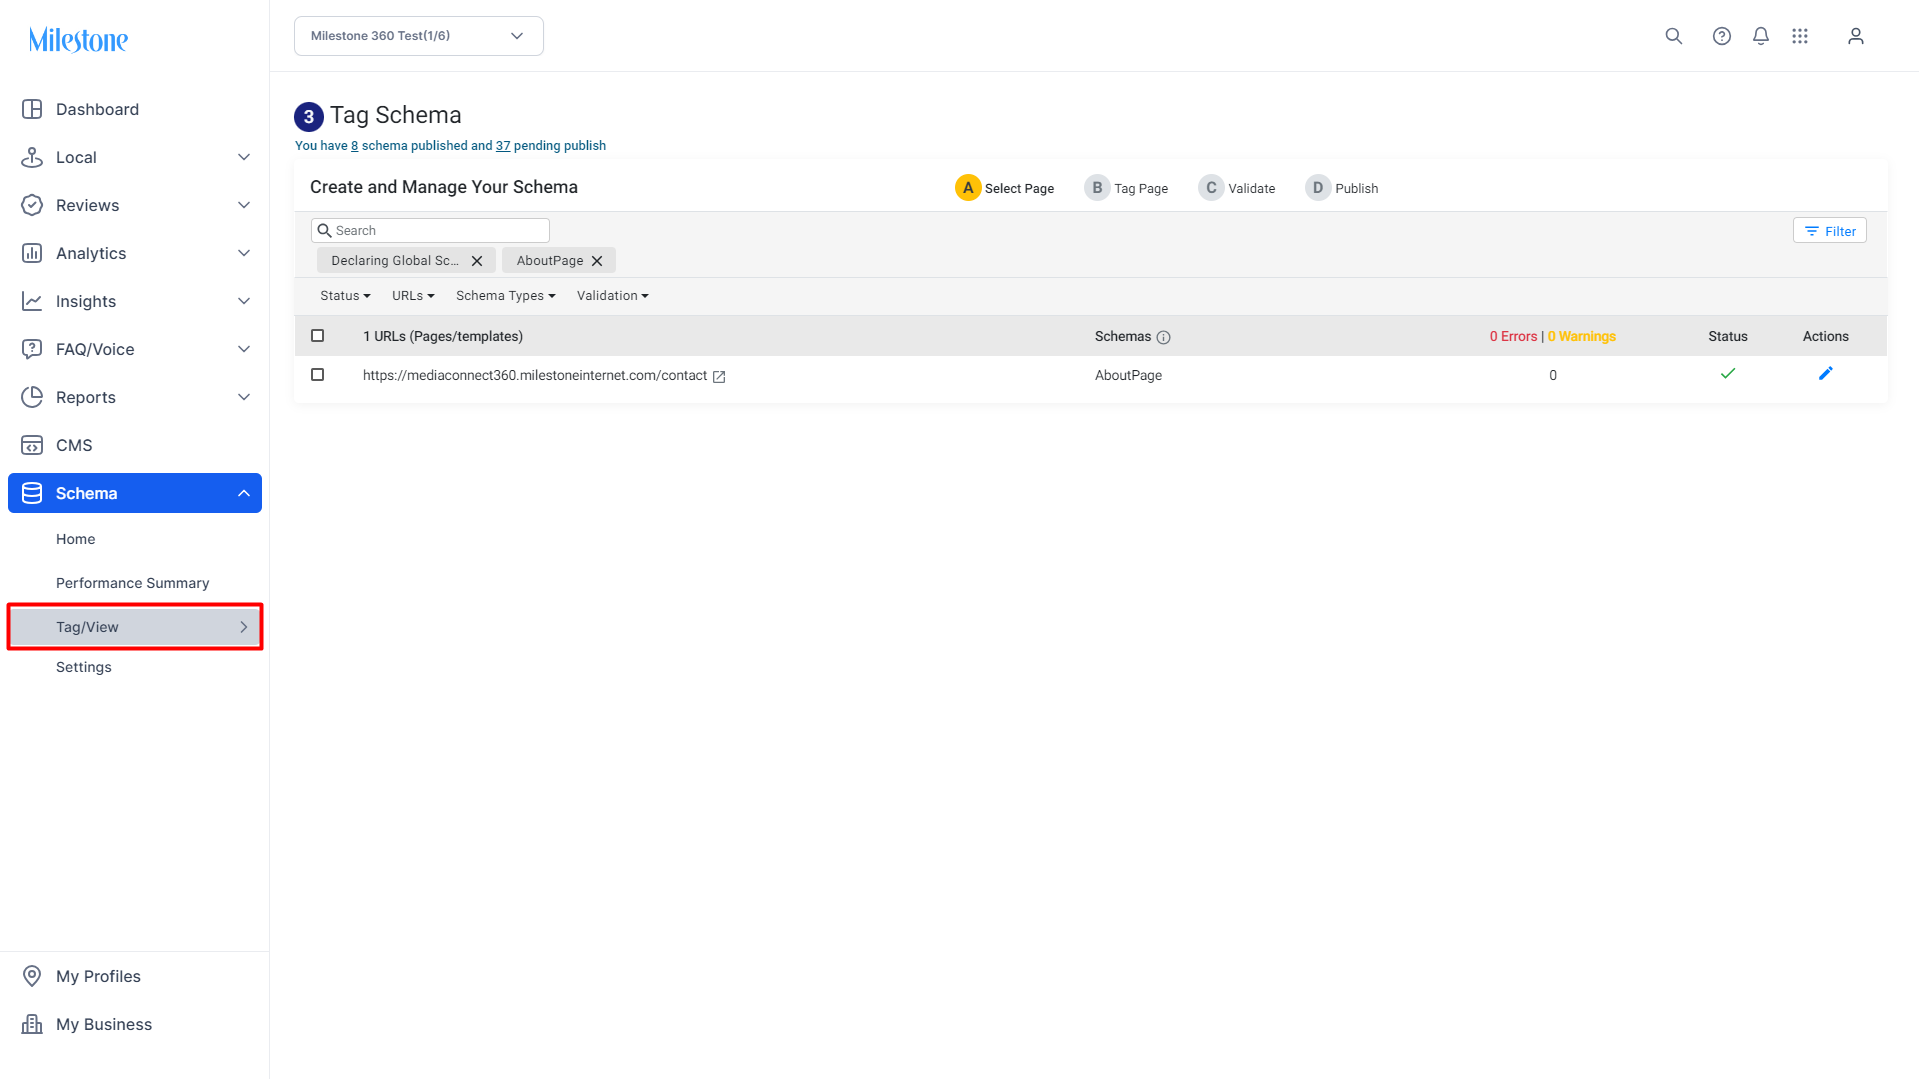
Path: Milestone Schema Manager > Tag/View > Tag Schema
Updating Global Schema across URLs
Step 1: Click on ‘Tag/View’ in the left navigation panel of Milestone Schema Manager.
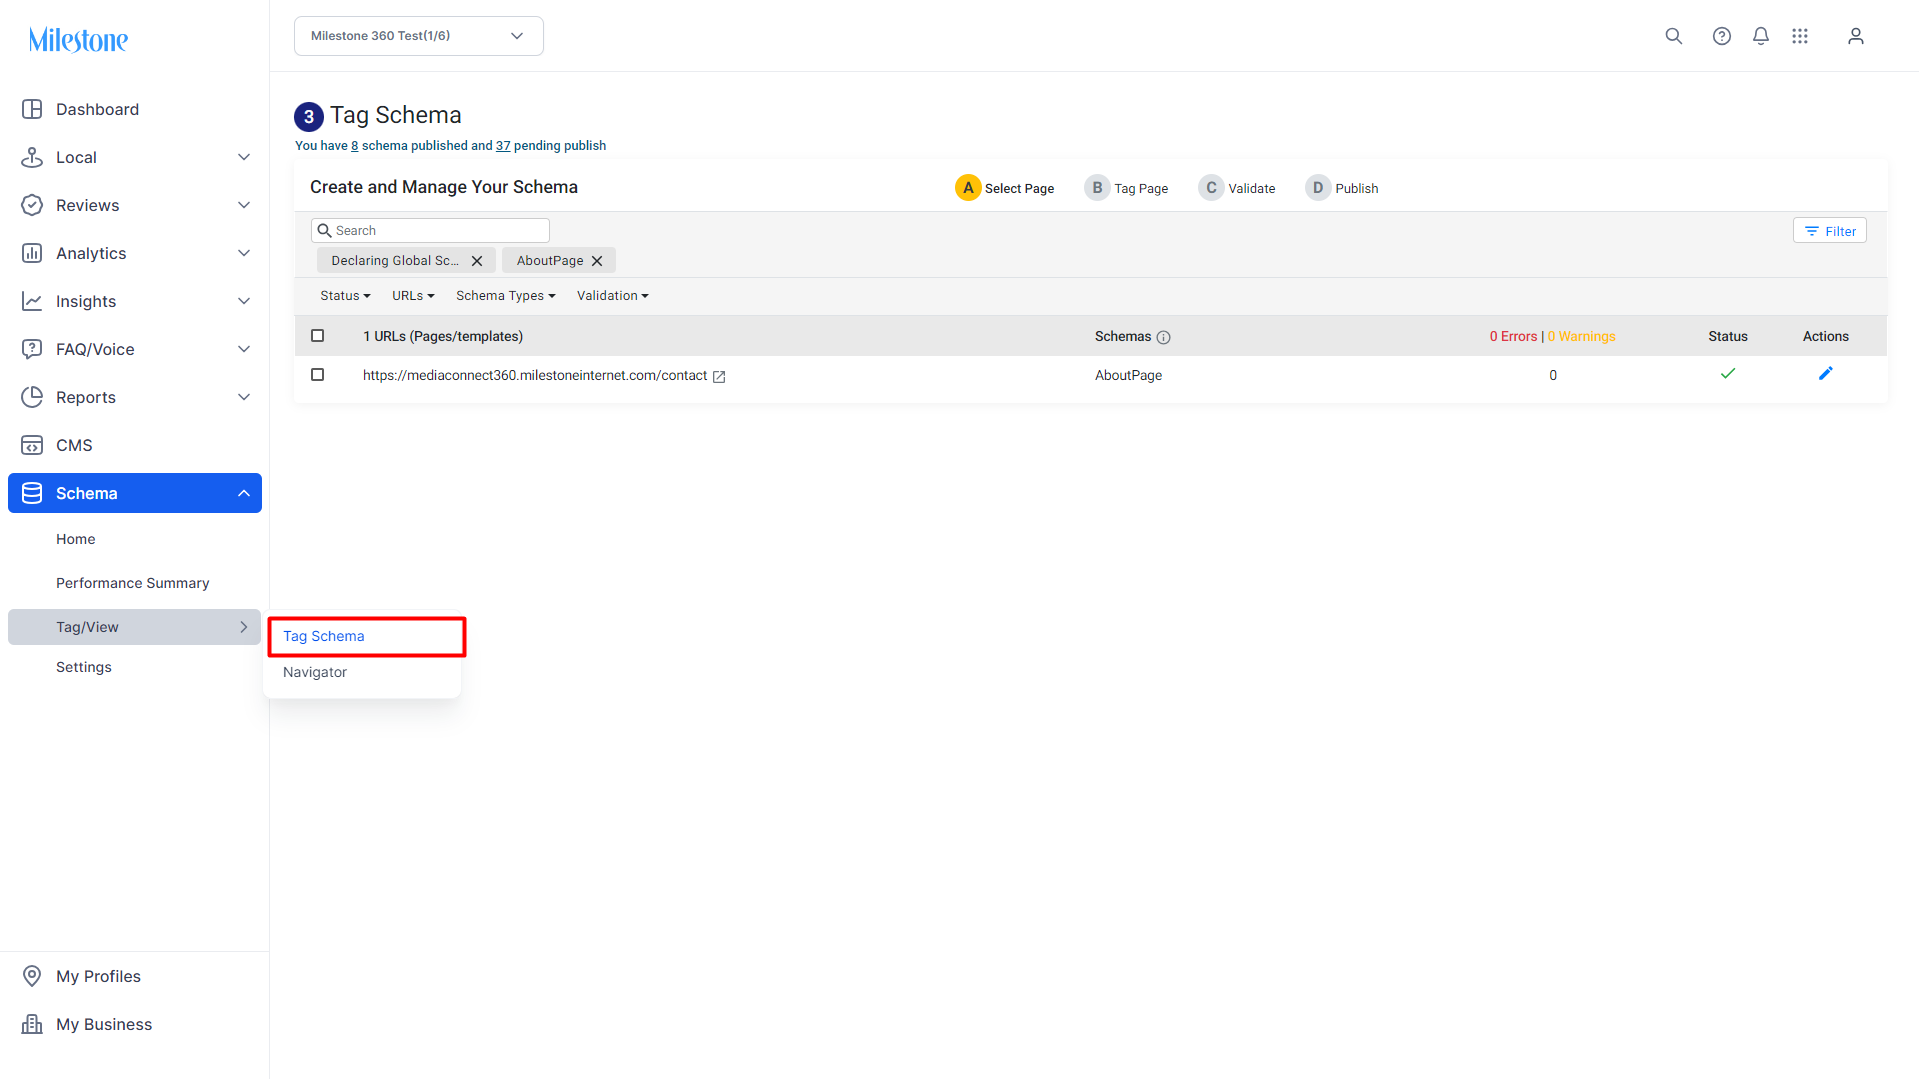
Step 2: Click on ‘Tag Schema’ for the expanded menu.
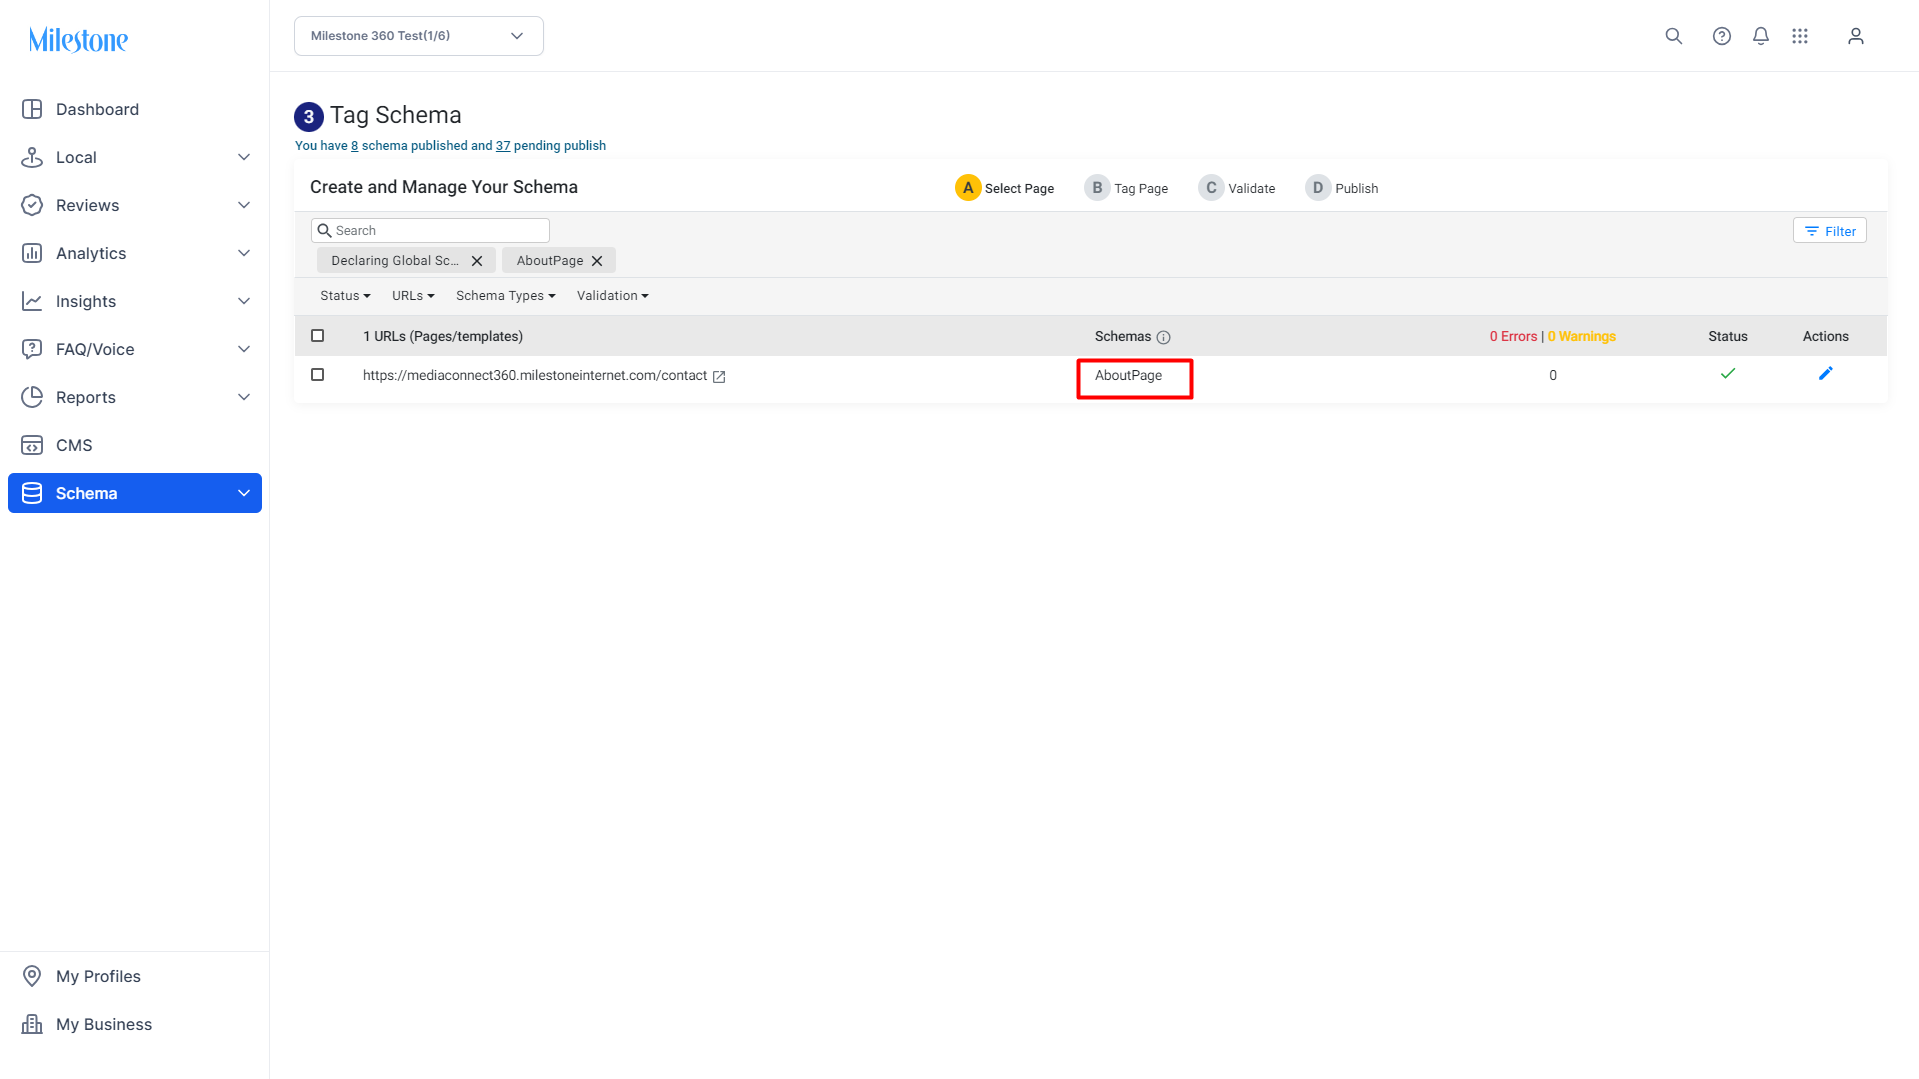
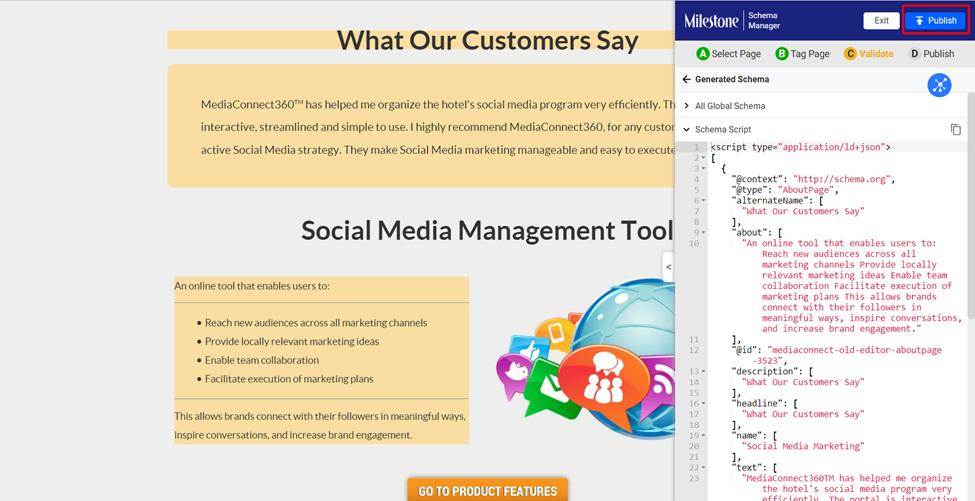
Step 3: Click on the ‘Edit’ icon corresponding to the URL declaring global schema in the ‘Actions’ column.
In this case, the AboutPage schema is declared across all the URLs
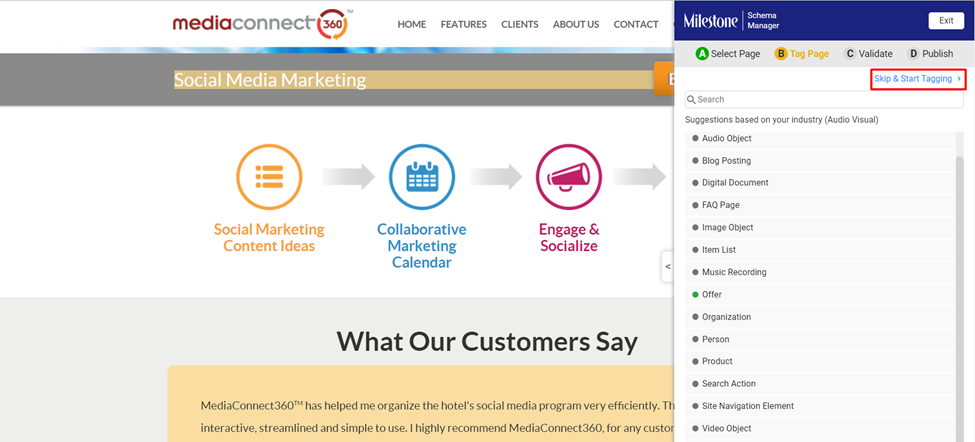
Step 4: You can skip the suggested section by clicking on ‘Skip and Start Tagging’.
Step 5: The icon to corresponding to the schema denotes that it is a Globally Declared schema.
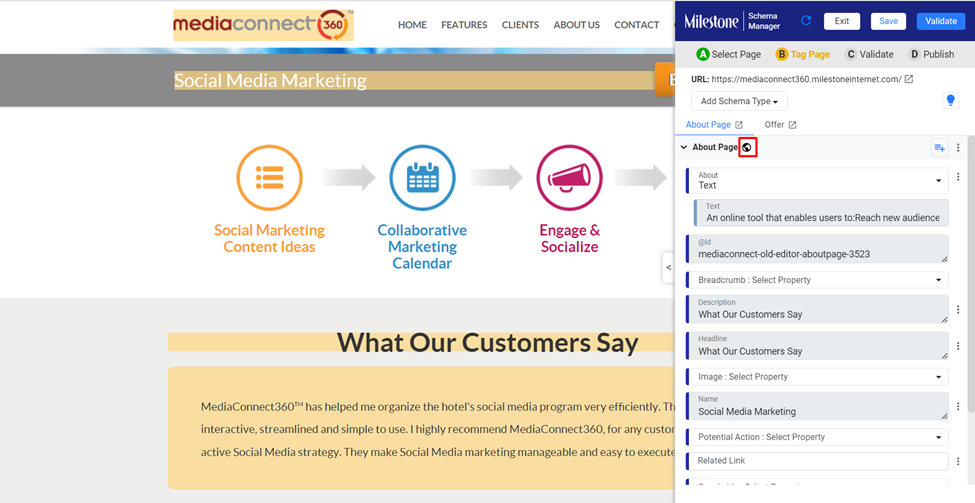
Step 6: You can go ahead and make changes to this schema, in this case we will add an alternate name property to the schema.
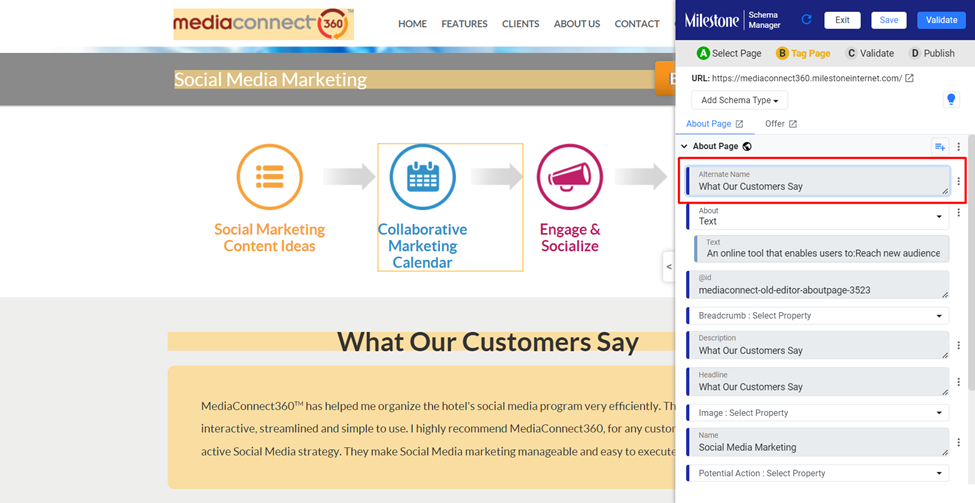
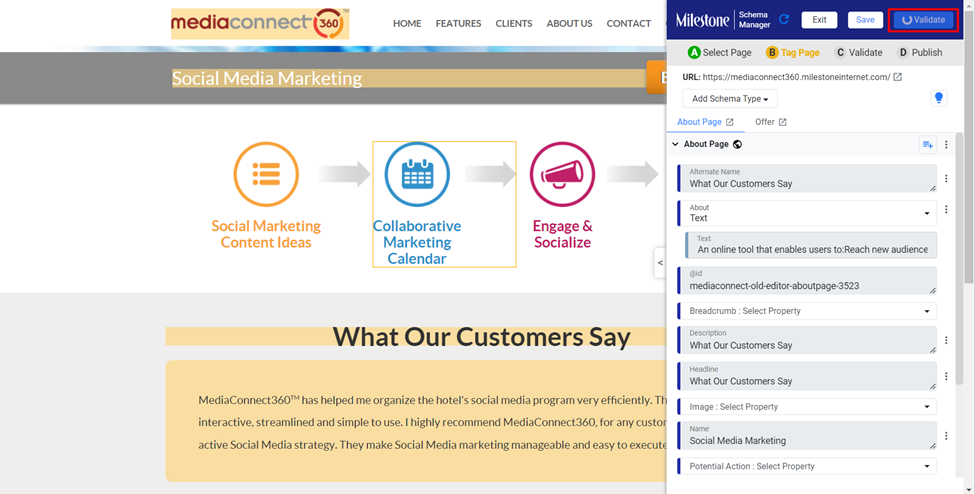
Step 7: Once you have added the new property or made changes to the schema properties click on ‘Validate’.
Step 8: You can see that the ‘Alternate Name’ property has been updated to the schema.
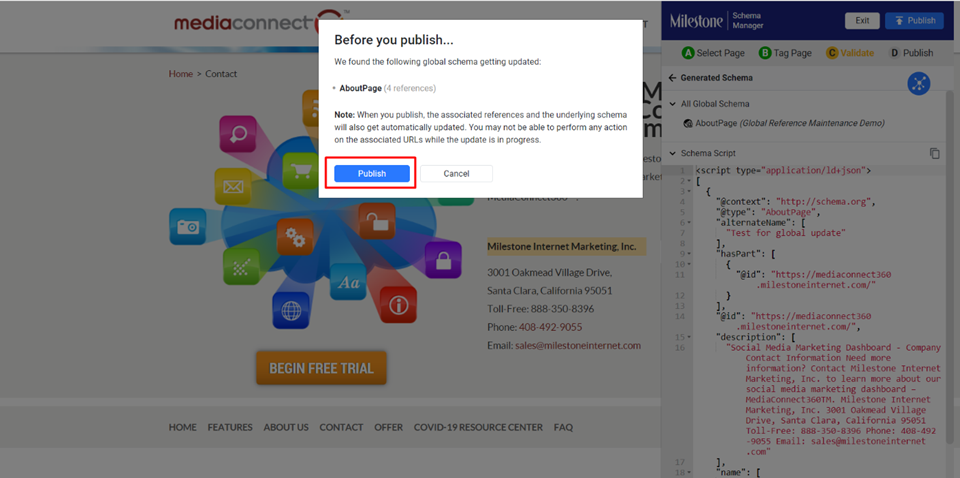
Go ahead and publish the updated schema.
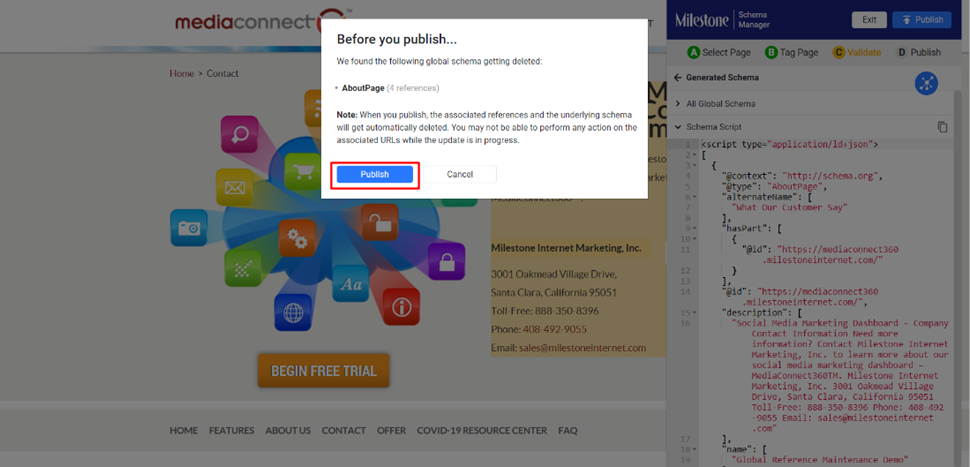
You will be prompted that this will affect the schema within referencing URLs as this is a globally declared schema. Click on ‘Publish’ if you wish to continue.
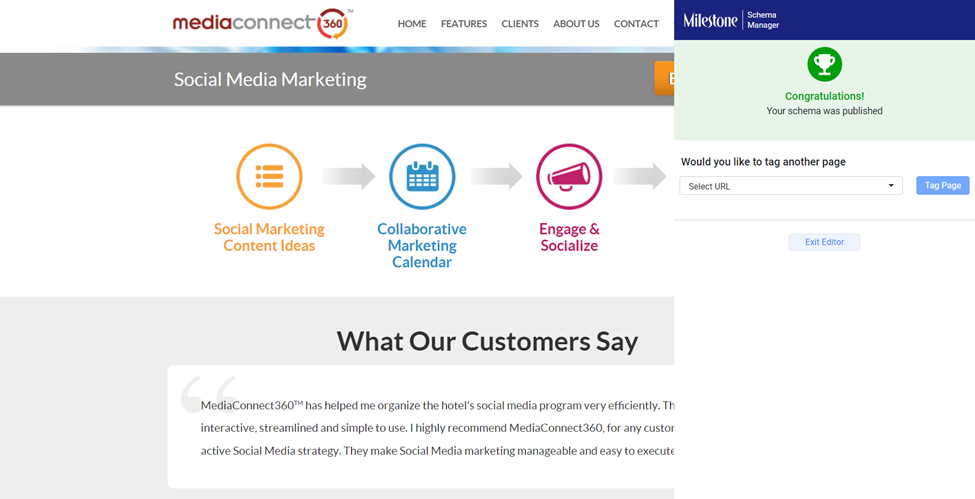
Successful publish.
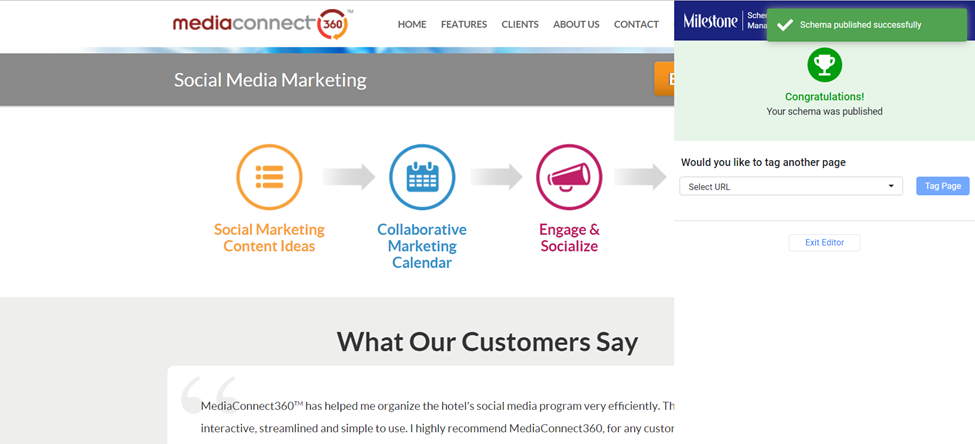
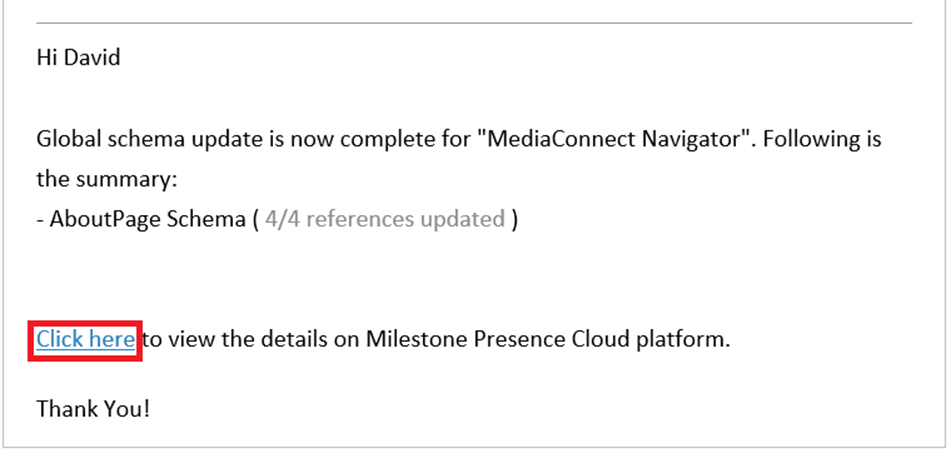
You will also receive an email notification of the actions carried out by you.
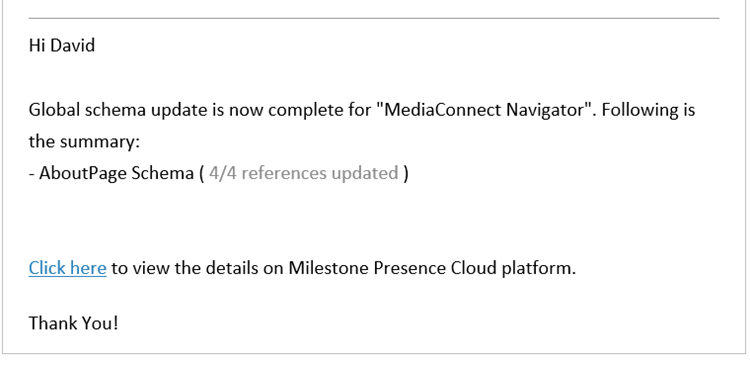
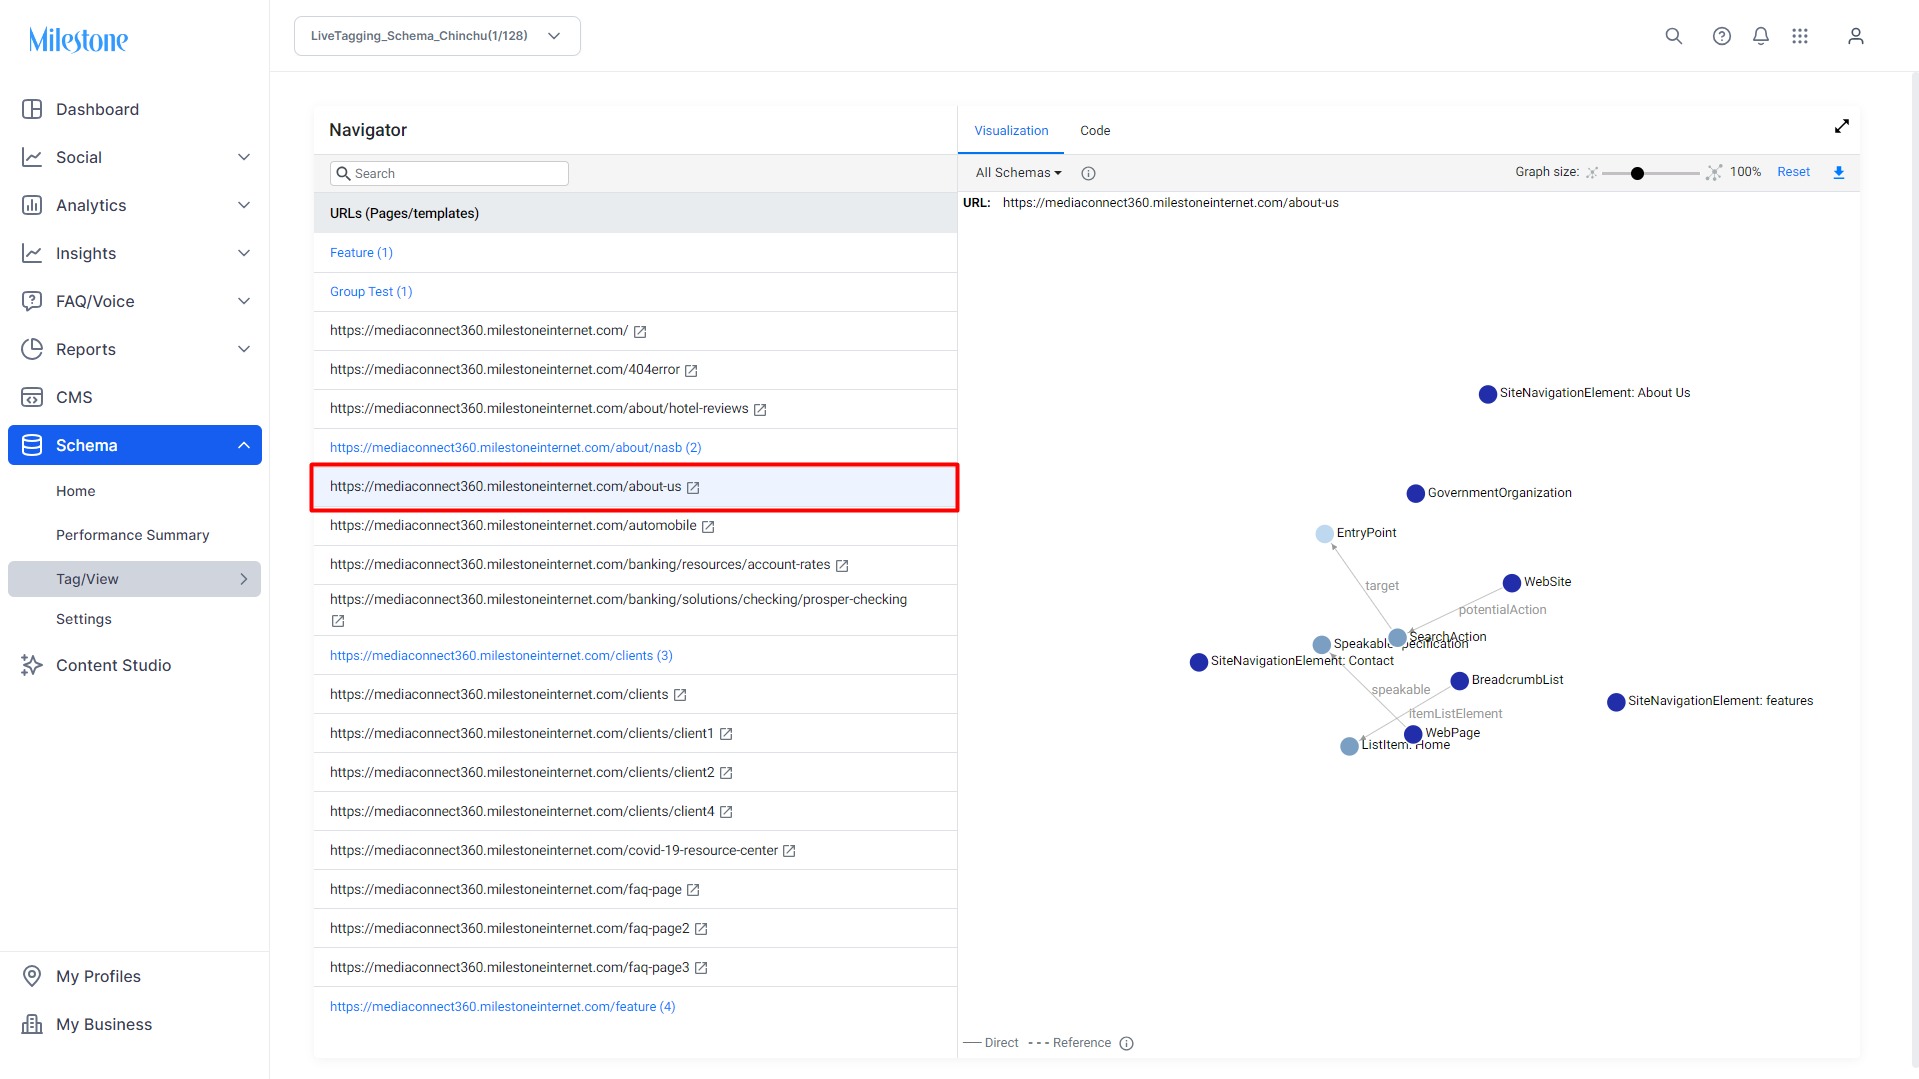
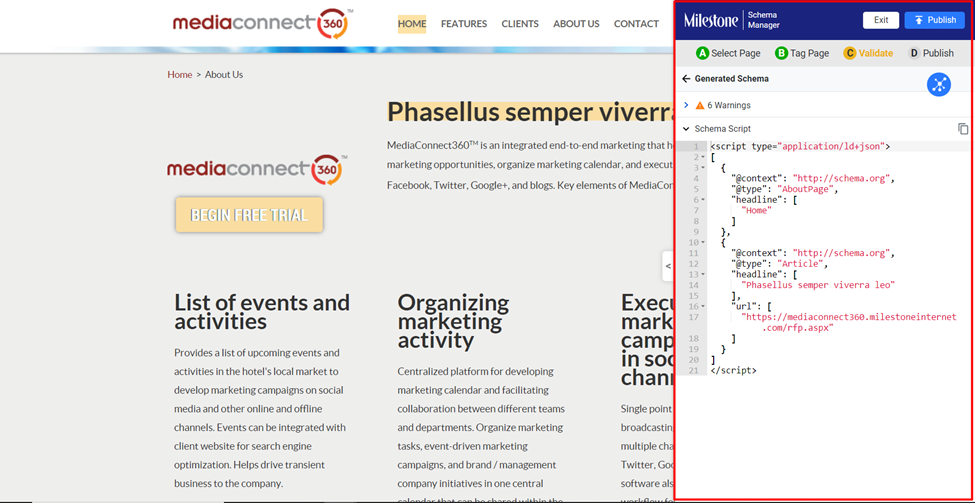
Step 10: Once the schema has been successfully updated, you can view the updated URLs’ schema in the ‘Navigator’.

Step 11: Select one of the referencing URLs.
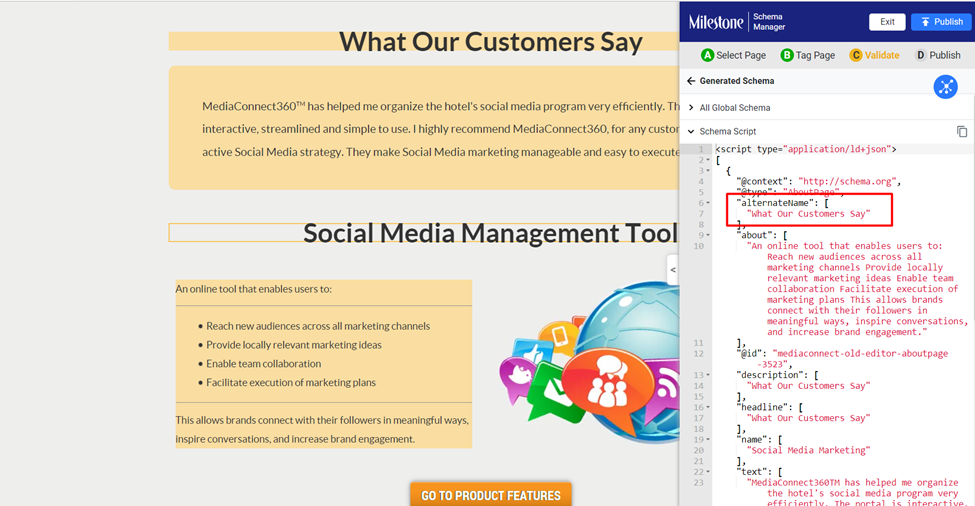
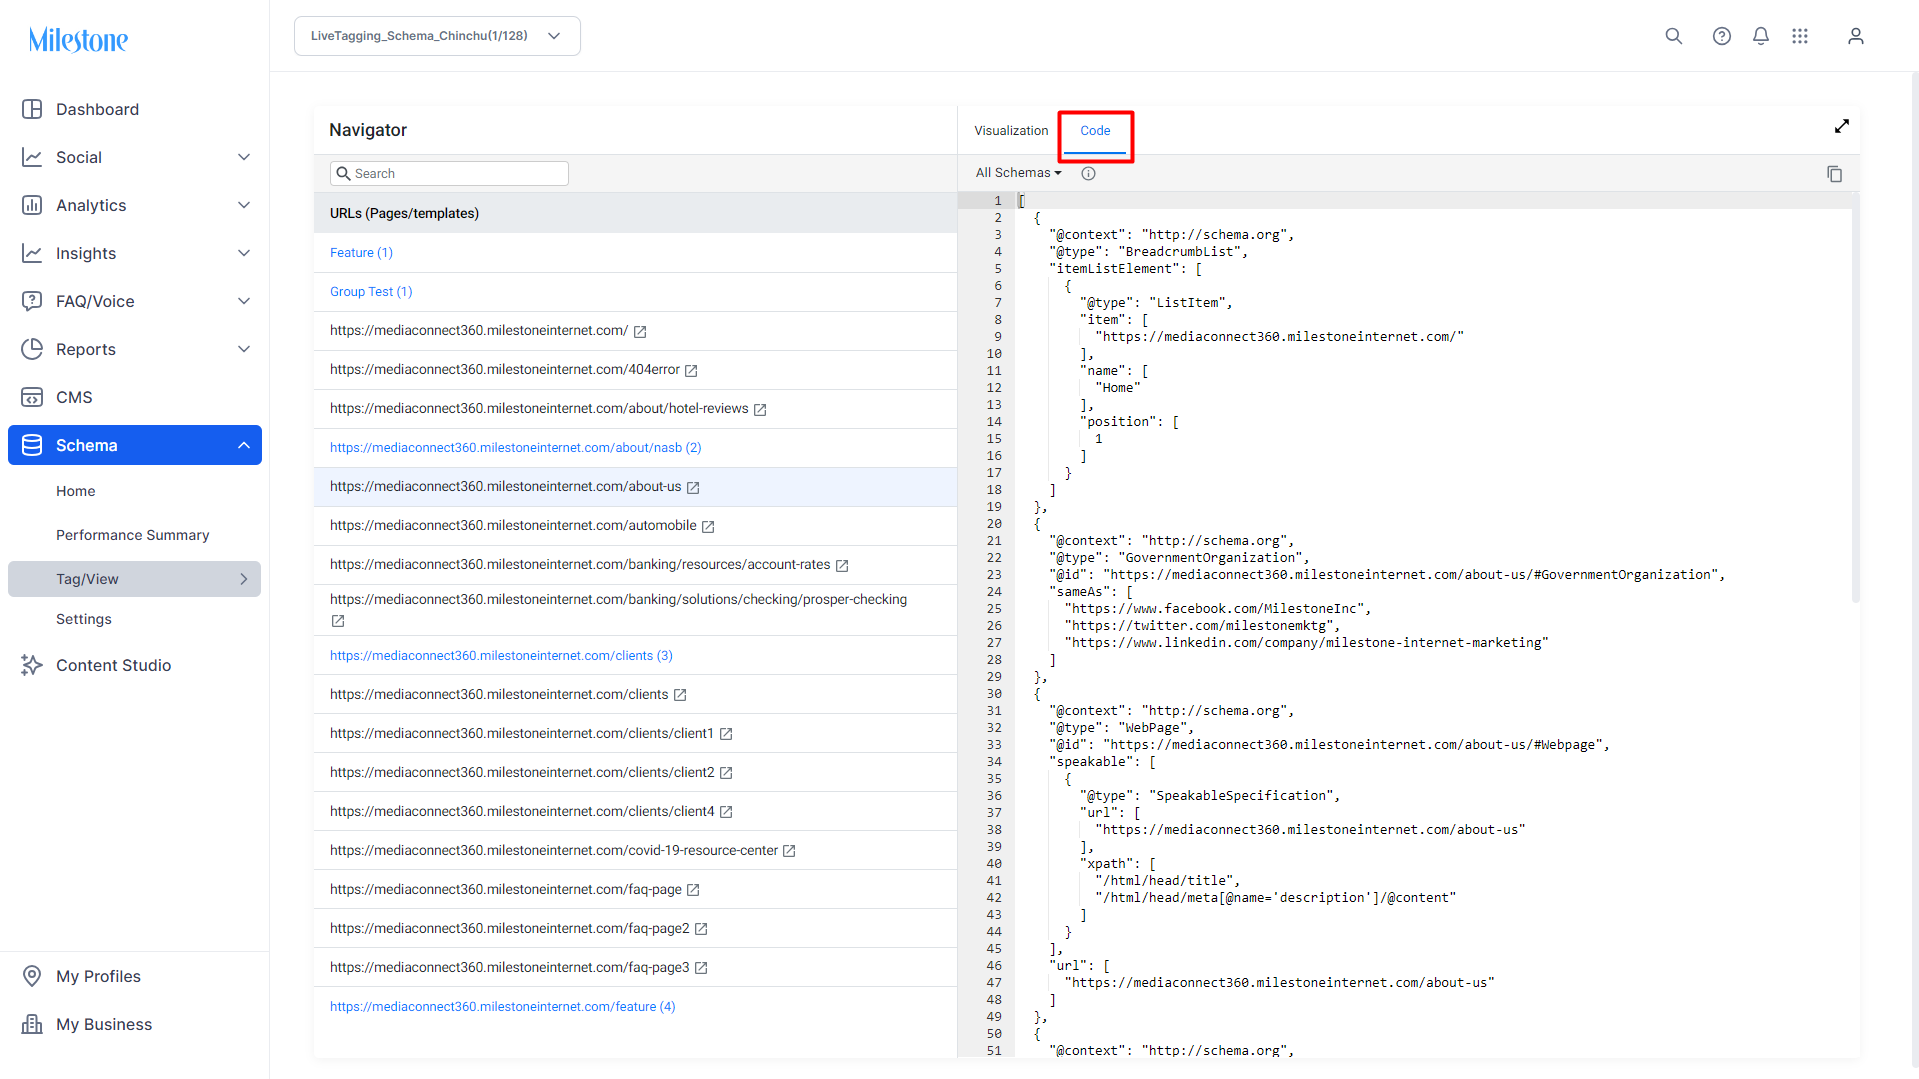
Step 12: Click on ‘Code’ to the top to view the schema. Here you can see that the property has been updated from the Global Reference Schema.
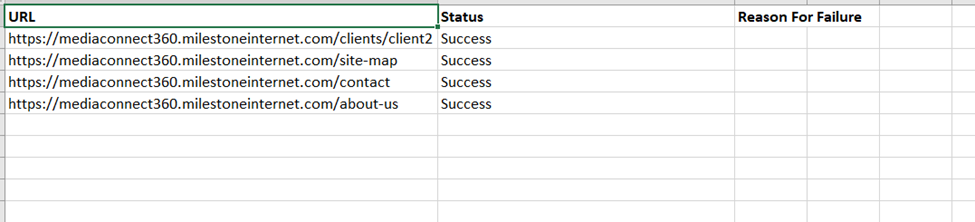
Once the action is complete you can download a status report by clicking on the link within the email.
You will be redirected to Milestone Reports. You can use the three-dot menu corresponding to the report to download the spreadsheet.
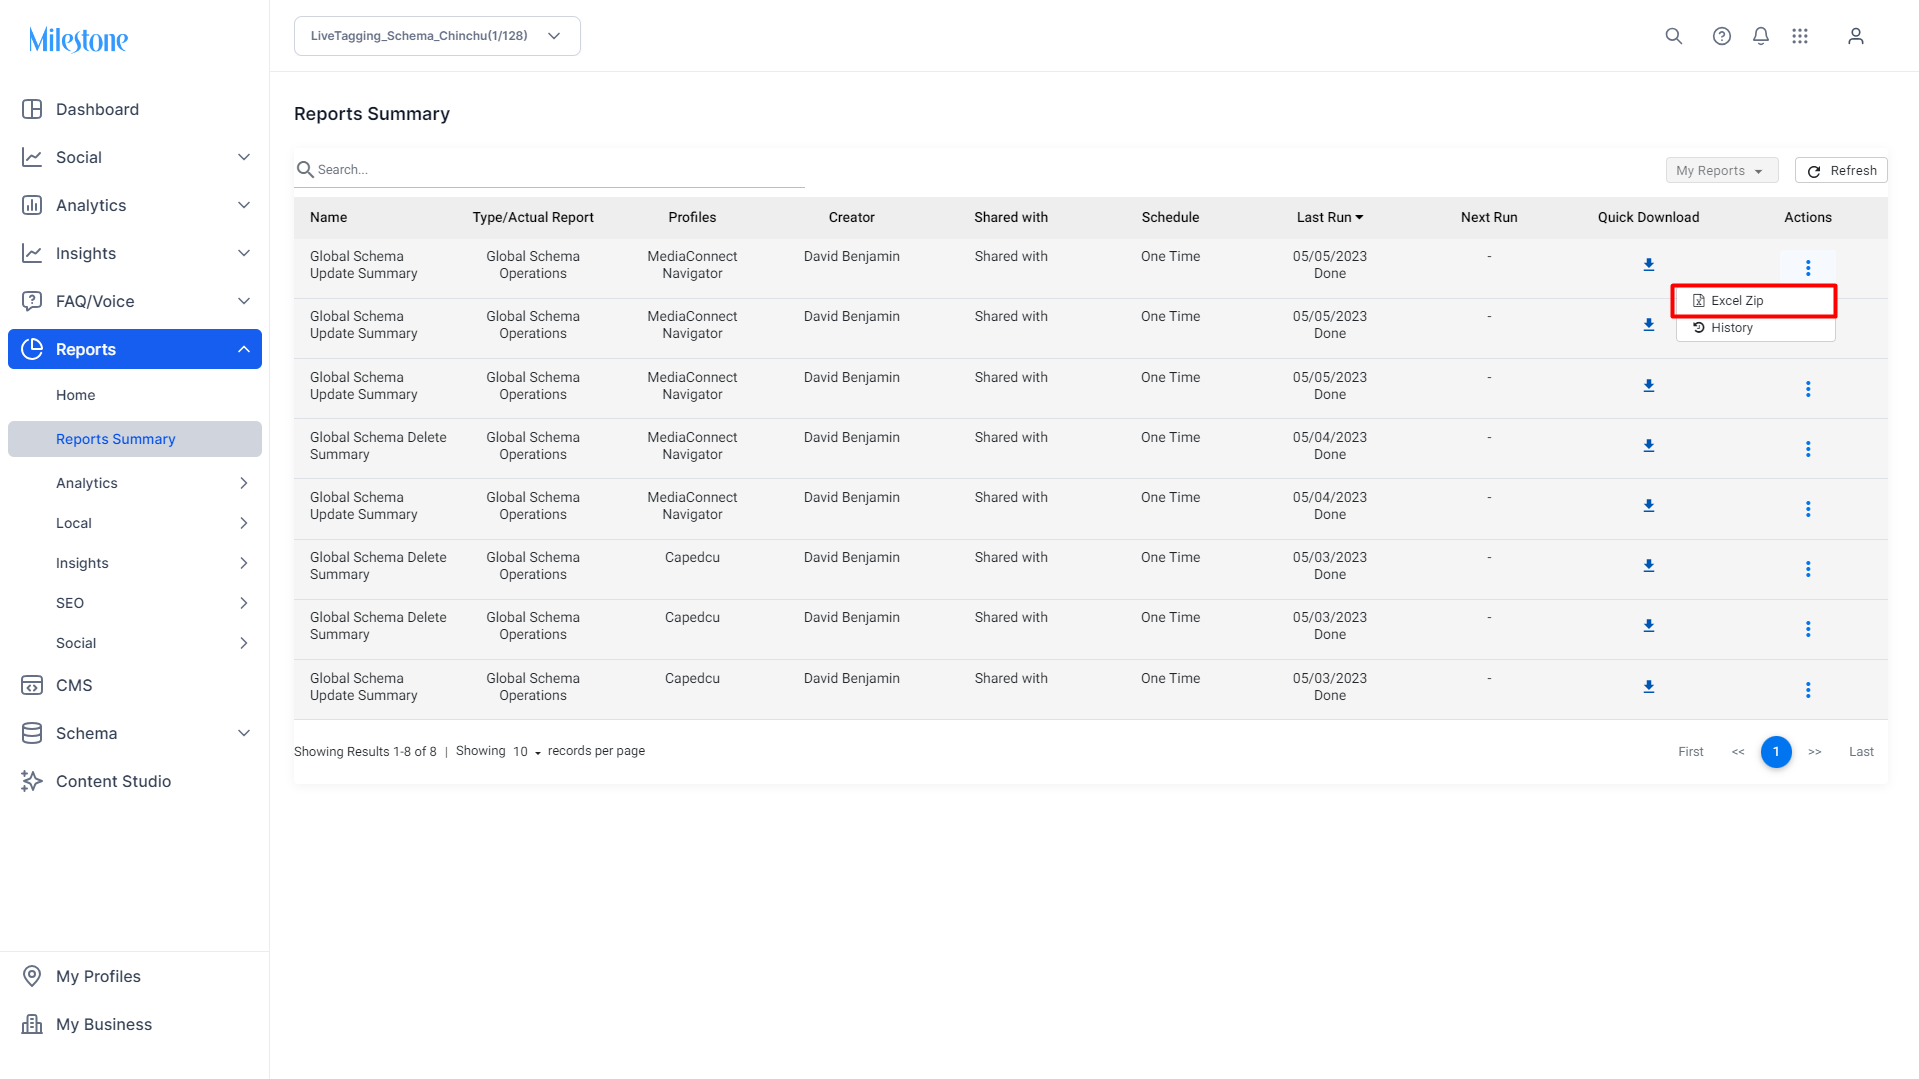
The report displays the affected URLs and the schema publishing status.
Deleting a Global Schema
If you decide to remove the Global Reference schema it will automatically be removed from all referring URLs as well
Step 1: Open the URL that is Declaring Global Schema. You can find these URLs by using the filters.
Step 2: Click on the ‘Edit’ icon corresponding to the URL.

Step 3: Click on the three-dot menu corresponding to the schema and select ‘Remove as Global for All URLs’.

Step 4: Validate the update to the schema.
Step 5: Click on ‘Publish’ to carry out the action.
Step 6: You will be prompted to the number of referencing URLs that will be affected by this action. Click on ‘Publish’ to complete the action.
Successful deletion
Upon opening the schema for a referencing URL now, you can see that it is no longer referencing the removed Global Schema.
Please note: This method can be used to update both Global Schema and Global Reference Schema